Hi there Bloglanders
Just a note to tell you that I'm on holiday touring the world and will be back in Blogland on 11 July 2013.
I've been thinking about this for a very long time - I do have enough projects to share for more than a month and it's easy to schedule posts BUT - I want my blog to reflect what I do and where I go and if I'm not in Blogland but having a holiday, I want my blog to do the same. You are more than welcome to browse the past 300+ posts on my blog, I'm sure there will be something interesting that you have missed and when I'm back I'll tell you all that I've done and share some more crafting fun with you.
Until then, keep safe and see U soon!
Hazel

Wednesday, June 19, 2013
Monday, June 17, 2013
Hertzoggies - that's cookies!
Hi there Bloglanders
I joined Wynand on a road trip over the weekend to Port Elizabeth. That's about 750 kilometres north from Stellenbosch along the East Coast. Lucky for us, it's a long weekend in Sunny SA so we only returned today. I took this picture with my iPhone to show you what a typical winter day in Sunny SA looks like.

I'm actually wearing a summer shirt today - 27 degrees Celsius!
And then I baked my fave cookies. Hertzoggies! They are very traditional in SA - named after a former president as they were his favorites as well. I'll translate my recipe some time and you can try it yourself. The pastry is light and flaky and the top is a meringue and coconut mix. This is what the ones looked like that I gave away:

I used an old book page, folded it over the cellophane bag where I sewed it shut, added a die cut scalloped circle and heart and it was ready for delivery. The Princess is wheat intolerant so I adapted my recipe to bake a wheat free version for her. I must admit, they are wonderful as the crust was made with a combo of potato, pea and rice flour - extra short. And this is what they looked like ready to be picked up.

Normally I would bake dozens of these over the Christmas holidays as they just look Christmassy to me BUT there is no rule that says they can't be baked in between. The whole family loves them and I love the idea that there are freshly baked cookies in my tins.
That's it. I'm off to do some more prep for our upcoming holiday. Have a great day and thanks for visiting my blog. If you want the recipe urgently, let me know in the comments and I'll hurry up my translation. Otherwise, please check back because it will be coming soon.
Hazel
Friday, June 14, 2013
Tween Boy Pressies - Mini Shoe Cleaning Kits
Good morning Bloglanders
Still cold and rainy in Sunny SA and I'm stuck with making fitted sheets. Pieter needed a new bed urgently and yesterday we went bed shopping. In the end we decided to take an extra length queen size because he is rather big and tall. Problem is - all our winter fitted sheets are for standard queen size!! Once again I made it my problem. A lot of work but in the end I bought winter king flat sheets and converted them to fitted queens - well worth my effort.
But that is not what I came to share today. I wanted to ask if you have ideas for presents for tween boys? I'm always struggling with that. Shop bought stuff like Lego is so expensive and I don't always want to go the edible route. This is what I did for my nephews:

A mini shoe cleaning kit. I made one of these for my husband many, many moons ago and it still travels the world with him. He likes his shoes clean and believes if you put Dubbin on your leather shoes regularly, they keep dry in winter. This is how I did it:
I bought thick book covering plastic from my stationary shop. Cut a rectangle big enough to fit my kit.
1. Sewed velcro onto the sides that will be able to open.
2. Sealed the other two sides with one of those machines which seals opened food packets. You can sew this as well if you don't have one of those machines.
3.Bought a huge pot of Dubbin, melted it and poured it into plastic containers. Cooled, added a lid and label and it was done.
4. A small shoe brush. This one came from my local pharmacy (sold in packs of 6) but if you can't get one, I've asked my husband to saw a normal one in half and it works just as well.
5. A piece of cloth to add that final shine to your shoes.
I didn't gift wrap these, just added ordinary string and a star die cut. The whole things goes into a glassine bag. I try not to wrap too girly for tween boys - they are REALLY fussy about things like that.
Now, if you have some ideas on your blog, leave me a link PLEASE - I need some inspiration! I'm off to finish those sheets. Thanks for visiting my blog today and please come back to play.
Wednesday, June 12, 2013
Time to Play in The Play Date Cafe
Good morning Bloglanders
I'm rather busy with all the prep for our upcoming road trip but couldn't resist to play along when I saw this week's color scheme from The Play Date Cafe.


I'm rather busy with all the prep for our upcoming road trip but couldn't resist to play along when I saw this week's color scheme from The Play Date Cafe.

I have a lot of birthdays coming up and have to get pressies ready and delivered before my holiday so this is what I did:

Ordinary (cheap) wrapping paper turned into a beautiful gift bag!! Remember that I showed how to make your own gift bags a few weeks ago? If you missed it, leave me a comment and I'll supply the link.
If you want to see what the rest of Blogland did with the color combo, just click here.
Have a Wacky Wednesday and thanks for visiting my blog today. Please come back to play!
Tuesday, June 11, 2013
The Craft Closet - DIY Peg / Magnetic Boards
Good Morning Bloglanders
As promised - another Craft Closet post!! Today I'm sharing how I did the "Pegboards" on the wall behind my sewing machines. I always love having pictures of my loves ones around and if I don't contain them to certain spaces, they take over my life.
This is what they look like:

Two are magnetic and two just for pins. I love putting up these magnetic Making Memories tins - they are an awesome way to store smalls. I even put the little bobbins from my sewing machine onto the magnetic board when I have them out.
This is what I did:


1. Ordinary Styrofoam sheet that I got from Builders Express - huge sheet and cheap, cheap! Cut it so size by warming a knife on your stove - it just cuts through it like a warm knife through butter. Remember, I showed you the same trick on how to make holes in Styrofoam balls? Click here if you missed that one.
2. For the magnetic boards, I added A4, self adhesive magnetic sheets. Just cut and paste until you have filled your surface. You can cut with ordinary scissors (I used my paper cutter).
3. Put some carpet tape on the back. I just love this stuff. It sticks and sticks and STICKS!!
4. Cut a piece of fabric bigger than your Styrofoam and just fold back onto the sticky carpet tape.
Ta da!!

For the non-magnetic board, you just omit the magnetic sheet in step 2.
My boards don't even have hooks on the back - I just used some more carpet tape to stick them to the wall.
That's it - another peek into my Craft Closet. I'm off to get some housework done. Have a Terrific Tuesday and thanks for visiting my blog today. Please come back to play.
PS. If you have missed the rest of my Craft Closet posts, just click on the small button on top of my page and you will be redirected. Otherwise, just click here.
Friday, June 7, 2013
More than a Thank You Note
Good Morning Bloglanders
Yesterday was a beautiful day in Sunny SA and I just couldn't get myself to sit down in the office to write a blog post. So sorry about that but it was worth every minute of it! Today will be as good (if not better) and I'm planning to go out there and plant some bulbs for my spring garden.
For some time I've been thinking of something to make to mail to Blogland friends over the world. Some people just go the extra mile to help you out even though you've never met personally. I do make a habit of thanking people when they do me a favor. So, I decided to make little covered notebooks. I bought small, ring bound, office notebooks and covered them with scraps of fabric from my stash. To the front I've also added "THANX" cut out with my alphabet dies and ironed on. Some hand stitching and it is ready to be mailed off. It fits into a standard envelope so an added bonus is that I'll save on postage.
This is the first one off the production line:

And the inside flaps:

I've used stamps from my stash and an ordinary laundry marker to put my name and date on the inside back page. There are a lot more of these notebooks and I will be showing them to you when I get to the pics. Also, I'm planning to add some original, South African packaging - of course I'll share - right here! The idea is that every book looks different - sort of a "once off" that will show the recipients that I really appreciate what they have done. Finally, I'm satisfied with my "Thank You" gift idea!
That's it from me - I'm off to the garden and if I have some time left, I'll head to the post office to mail off my first batch of "Thank You Books". Thanks for visiting my blog and please come back to play as I have lots more to share with you. Have a wonderful weekend!
Wednesday, June 5, 2013
Layout gone wrong
Hi there Bloglanders
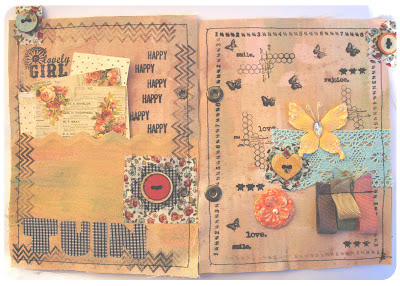
Yesterday I was lying on my couch in the winter sun while paging through my albums. And so I noticed that I made a mistake while journaling on one of the layouts. I actually liked the layout even though it is a few years old and I decided to keep it as it is - just to fix the mistakes. Surely you can spot them!!

I still love everything about the story, the layout, the papers and now the two extra pops of color in my journaling! Just goes to show. You don't have to start all over - just give your page a bit of character!
Thanks for visiting my blog today. Tomorrow I'll do another of the Craft Closet posts and before the weekend I'll show the "friendship books" I'm currently working on. Have a Wacky Wednesday and see U soon!
Tuesday, June 4, 2013
Multimedia Covered File
Hallo Bloglanders
Still pouring wet in Sunny SA!! Let's warm the air with some crafting fun! I'm here to show what I made for my mother's birthday. They downscaled a bit more than a year ago and now there is no room for clutter in their flat. Still, mum wants to keep letters, pictures and info on her children, grandchildren, garden and home.
So, I came up with this Multimedia A5 covered file:

I used some calico, painted it with fabric dye and then added stamping, ribbon and embellishments from my stash. And this is what the file looks like from the back:

Imagine all that smiling peeping at you from your bookcase! I even made divider pages for the inside:

And some close-up pictures:

I love how my project turned out and best of all - I didn't buy a single thing! Most of the stamps came from different MME sets and the dies used to cut the fabric are from Spellbinders.
That's it from me. I hope you enjoyed seeing my mum's birthday gift as much as I did making it. I think I'll do one for myself as well. Thanks for visiting my blog today. Please come back to play as I'll be back with some more crafting fun. Have a Terrific Tuesday!
Monday, June 3, 2013
The Craft Closet - Mood / Inspiration Board
Good morning Bloglanders
I hope you had a fab weekend - it is always good to have some extra time to catch up with family, friends and your own stuff, isn't it? I didn't do much as it was super cold and rainy in Stellenbosch. Most of my time was spent in front of the TV under my favorite quilt. I also did a lot of planning for our upcoming camping trip. One thing about camping - it is a LOT of work before you go and a LOT more when you return. Well, Wynand enjoys it and once you get going it's super fun.
Today I wanted to share my Craft Closet Mood / Inspiration Board. I love Pinterest but nothing beats a real sample. So, whenever I got to craft fairs or markets, I collect inspiration - projects that I still want to do or some only to admire the creativity of others. All this goes onto my board.
My board is actually a garden trellis (Yes!! recycled from my garden) that I painted with a sample pot of blue paint. This is what it looks like:

I use ordinary clothes pegs and hooks to put my stuff up and once a year I take everything off and sort what I still need / want and file / throw the rest away. As my craft space is super small and I have two double glass doors in it, I don't have a lot of wall space. I also didn't want to clutter the rest of my space with stuff standing around. This is the perfect solution as everything is contained to a specific space and I can see it all the time. What is the sense of an inspiration board if it doesn't inspire you??
Best of all - whenever I do a craft show, I just take everything off, use the trellis in my display and afterwards everything gets sorted and up it goes again - I don't have space to do doubles anywhere.
Well, that's it. I'm off to get some office work done but will be back with some crafting fun right here on Play as U Go. Have a Marvellous Monday and thanks for visiting my blog.
PS. If you missed the rest of my Craft Closet posts, just click on the little button on top of my page to be redirected to a summary of everything that has been posted.
Subscribe to:
Posts (Atom)