Showing posts with label cut and print. Show all posts

Wednesday, July 29, 2015

Got 20 Minutes

Hi there Bloglanders

I hope you are well. Winter finally arrived down under in Sunny SA but don't fear - we don't get snow in Stellenbosch. Our winters are more like European summers!! So, I stay inside where we have a real wood fire going all the time and CRAFT, try out wonderful new recipes and sew.

Yesterday I told you that I read a whole lot of inspirational posts. In keeping with my summer fruit theme, I took up the Paper Crafter's Corner challenge "Got 20 Minutes".

And my project:


8 Fruit themed cards!

Sometimes your schedule is way too busy - you just can't start on a new project BUT with 20 minutes to kill, you can make a HUGE difference to your pressie stash and your gift wrapping station.

I cut all my scraps in sizes of 6x6, 6x4 and 3x4 - the smaller pieces go towards die cuts. And this is how I keep them on my craft trolley:


In a plastic container - leftover cardstock, project life cards and even some multi media pages. When I start on a new project, this is the first place I go to.  No exception with my 20 minute card project.

Second stop is my die cut box:


Whenever I cut and print with my Silhouette and there is some space left on the page, I add a die cut shape for my "jewellery box".

With only 3 minutes used gathering stuff, I used the rest of the 20 minutes to glue everything together.

I even had time to add twine to two pineapple tags for my gift.


I wrapped half of my cards to give away as a birthday gift to a special friend. The rest went into my gift wrapping stash.

And here is my pressie - ready for delivery:


The card on top says "Geluk" (= Congratulations). I don't even have to add and additional tag to say "Happy Birthday" to my friend.

Here you can see the two pineapple tags that I added to the back of the Cellophane pocket.


I'm most definitely going to do another "Got 20 Minutes" challenge. Next one up will be a Project Life mini book. If you missed out on that one, read all about it here. To make this challenge even harder, I plan to take pictures as I go - YES!!! to show you exactly what I did - all in 20 Minutes!

That's it. I'm off to get my hands on another 20 minutes.  Thanks for looking at my blog today. Have a Wacky Wednesday and please come back to play.

Wednesday, April 8, 2015

Not just Evelopes

Happy Wednesday Bloglanders

I LOVE beautiful envelopes!! If you make your own cards, sending them off in ordinary, white envelope is like wearing a beautiful evening dress with flip flops. Let us start with the ones I made for my sister's kids:


And the back:


A bit of matching Washi and we are ready to go. All the boys are big rugby fans so I incorporated it in making the envelopes with Silhouette's "print and cut" function. No need for name tags - the jerseys says it all! Inside the envelopes I've got money, a small gift (shoe laces) and a card. Don't fear if you don't have a silhouette, I've used a coin envelope as a template (much less paper) and of course - I customized the size to fit my pressie.

But not only did the boys get beautiful Birthday envelopes, My dad got one as well.


All my fellow Creative Memories lovers from years gone by might recognize the paper. I've allocated ALL my unused paper to my "envelope" stash so you'll be seeing a lot more of them around here. For this one I didn't even use my Silhouette - trace the template and cut - decorate and you're done.

Last but not least. A 80th birthday card for my mum's "sew loving" friend:


For those of you who haven't noticed - I joined the Instagram gang. Find me here. It's FUN, FUN, FUN and I'm having a ball figuring out the new technology.

That's it. Enjoy the rest of your Wacky Wednesday and next time you need an envelope - go to that unused paper stash and make one yourself.

Thanks for visiting my blog.


PS. I'm submitting my envelopes to the SimonSaysStamp Wednesday Birthday challenge. Hop over there to see what the rest of Blogland did.

Thursday, October 9, 2014

Print, Paint and Cut with my Silhouette

Hello

I can't wait to show you what I've done!!! I've told you that I'm doing Wilna's Art and Design course over at Big Picture Classes. It is totally awesome. The only problem is that I can't keep up. Goodness, the amount of freebies, handouts and videos. I don't think it has ever been done before.

Unfortunately I've never tried my hand at painting before BUT I quickly adapted my strategy to print, paint and cut with my Silhouette. Let me show you my finished project:


Just 3 steps:


1. Print on watercolour paper. Remember your registration marks!
2. Paint and let it dry.
3. Cut with your Silhouette.
4. Use in your projects.

Even mine looks like art!  I printed a stack and painted them over the weekend while camping. Now  I can just use it on layouts / Project Life / Cards.

And I;ve got another one to show:


I even made my own title by writing the word with a big Koki pen on office paper (yes!!! My very own handwriting), scan, trace and lift in Silhouette studio, filled the word with black and used the offset function for the white border, print and cut and it's done.

Here you can see my finished "artwork" made with Wilna's ampersand cut file and coloured with my watercolours.


And a closer look at the die cuts:

That's it!! I'm off to look at another video and will be painting the evening away once I've decided what to try out next. I did learn something new today. There will always be a way to do something - you just have to find it!!

Have a Thunderous Thursday.


Tuesday, July 15, 2014

Butterfly Multi Media

Good morning Bloglanders

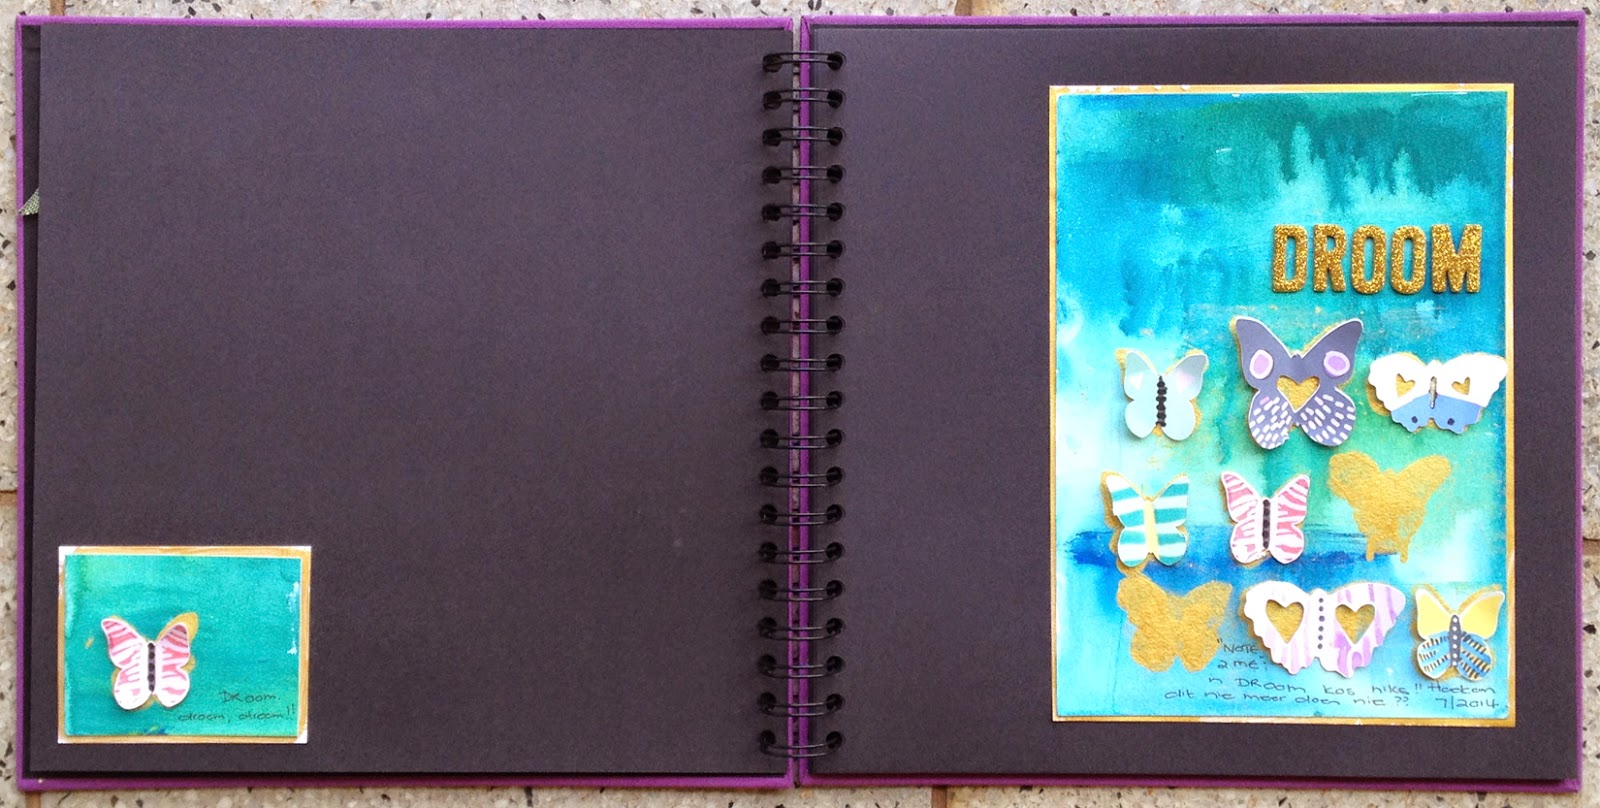
On Sunday I told you about the Multi Media adventure Alexa and I had and showed her pic. Well, today it's my turn. I haven't been to my Multi Media book this whole year!!! Rather late than sorry so out she came and this is my effort for July 2014:


Once again I used my Silhouette and the "print and cut" function for the butterflies. The file is from Wilna Furstenberg's shop (iheartstudio) and I painted on watercolor paper with acrylic paint. Once again, the inspiration came from one of Wilna's video's - not that mine looks ANYTHING like hers - IMPERFECT ME!!!!

And a peek into my book:
I'm not sure if I will add more journaling to the pages but for the moment I like it as it is. The letters for my title was die cut with my good old Bug from glitter foam. 

I like things lined up, squares that are perfect squares and so I can go on. Not that it turns out like that every time but I have to brace myself and just leave it when something does not go according to plan. That's what I love about Multi Media. It seems that the more that go wrong, the more creative the project.

That's it. I'm off to try something new. Thanks for looking at my blog and have a great day!

PS. DROOM = DREAM


Friday, August 30, 2013

Embellishments Galore

Good morning Bloglanders

I hope you are well. It is very, very cold and wet in Sunny SA and I feel like heading straight back to bed BUT places to go, people to see and things to do.  Today I've got some eye candy to show.

When I buy something, I try to use it to save on something else. Here is what I made to save on embellishments for my projects:


I've used my Silhouette to "cut and print" the images and background. As I'm new to Sihouetteland I stumbled upon the "offset" button by chance.  This is the most wonderful function!!! It outlines your image and you can even choose how big the outline must be.  Here you can see how I did a fuzzy cut around images by using the "offset" button. Just remember to "no cut" the initial image!


I do like the little bit of white around my images - just makes them pop. Next week I'll show you how I did the Kitty Cats - I've done them from a stamp (not so DUMMY anymore!) and they actually cut much nicer on the offset line.

Back to my dimensional embellishments.  For my background image I moved the "offset outline", filled it with color and did the "print and cut" again. In between the two layers I've got pop dots to give the needed dimension.  I do get super excited when I think about everything I can do with this!

Here you can see a close-up of the sewing machine:


And, as always I packed some to give away:

That's it. Super easy, affordable dimensional embellishments!  I'm off to meet the people, see the places and do the "things".  Thanks for looking at my blog today.  I'm having a super, dooper blog month - all thanks to you.  If you need more info on how I did my DUMMY projects - let me know in the comments and I'll gladly help.

Have a great weekend and please come back to play.

Hazel