Showing posts with label Paint. Show all posts

Wednesday, September 30, 2015

Play as U Paint

Good morning Bloglanders

I hope you are having a FAB week. I got into my Summer prep as we had the most wonderful, sunny weather over the weekend and then it started to rain ................................

Plan B. I left all my summer goodies on my craft desk, got a fire going in the fireplace and started painting and coloring.  With all these coloring books around, there is no excuse not to be creative!! As I'm sorting through stuff that I want to keep and purge  in an attempt to downscale, I stumbled upon these watercolour mini paintings that I've done and decided to frame it.


It's not perfect - but then, I'm not a "painter". (Actually I'm a winemaker!) and up on the wall nobody will even notice my imperfections.


Did you see??? .................................. I even signed my work-of-art!!  Let me tell you how easy it was.  I got butterfly images from a book, made pencil drawings on watercolour paper and started painting. As easy as that.  I fitted 4 images onto 1 x A4 sheet of watercolour paper and will show the rest of the collection once I've got them framed.  My frames are shop bought and should I wish to change the images in future, it will be easy.

This week I'm submitting my work-of-art to the SimonSaysStamp Wednesday challenge: 

                               NO DESIGNER PAPER

Easy challenge. It's SO hard to get designer paper down under in Sunny SA that we tend to DIY anyway!!

If you have enough on your walls, my butterfly would work just as well on a card or tag. Just stamp a sentiment and you're good to go.

Thanks for looking at my blog today. I'll be back later this week with the rest of my butterfly collection. In the meantime, have FUN and craft on.


Wednesday, May 13, 2015

"Layout" gone wrong???

Happy Wednesday Bloglanders

Just a quick post to show what I've been up to.  The SimonSaysStamp Wednesday Challenge for the week is "Let's get Sentimental".  As I don't do cards, I decided to try my hand at moulding paste and make a Project Life title card.


Once a month I record what is current at Hamman HQ and I thought this mini layout would be perfect.  Everything that I've used, was out as I wanted to participate in this challenge. (Heidi Swapp: Stencil, wood veneer and Dymo)

I started out with a stencil from Wilna Furstenberg's Art and Design class, light molding paste and acrylic paint. Then everything was too white, so I added some yellow and I went on adding stuff until everything seemed all wrong. Wilna calls it "overworked". YES!!! My page is totally overworked but I decided to keep it like this, add it to the rest of my Project Life spread and maybe tone it down a bit. Normally I would just throw something out that does not meet my expectations but I decided to embrace my imperfections in 2015 so this one's a keeper.

Tomorrow I'll be back with my "layout gone wrong" - can't wait to see how it turns out. Check back and you will see ..........................

14 May 2015
And look @ me now!!


Happy Wednesday!


Tuesday, May 12, 2015

Design on Time - I love to SEW layout

Hello Bloglanders

I'm SO sorry for not putting up post every day but it's Fall down under in Sunny SA and the most beautiful days - we sit outside, eat outside and spend time on our porch and gardening. What more can a girl want?? You can even see the sunshine on my layout - if you've got it, flaunt it!!

I did get to the Amy Tangerine Design on Time Challenge #6. It's from Shanna Noel and you can watch the video here. The objects to use are paint (again!!), a list and fabric scraps.


By now I've learned that if you want to get a layout done in 15 minutes wet paint is not your best friend. SO,
I used black ink to do the stripes for my background. GREAT idea - it almost dries instantly!  My fabric strips were cut with my paper trimmer to speed things up and it ended up on a banner across my layout. I must admit, after 10 minutes of work, we had a power failure for more than 2 hours and I ended up typing my list as our computer system has backup batteries to keep it going.

At least it kept me busy!!! All in all I think I still would have finished in time but "load shedding" is here to stay so I did the best I could and finished up my project first thing this morning.

Now  for the story ............................................ I do love to sew but normally I only do it for myself or my daughter-in-law.  Last year I did a bit more than that - 21 outfits and that's only clothes. I also did LOTS and LOTS and LOTS of home ware projects. And this is the story behind my layout - more than 20 outfits in a bit more than 6 months and only 2 were for myself!!

Now, hop over to see what Amy and Jamie did with the same "ingredients".

I love a challenge and these Design on Time videos makes it SO much fun.  Thanks for visiting my blog today. I'll be back tomorrow with a "Moulding paste" project. Check back to see how it turned out!!


Tuesday, April 28, 2015

Design on Time - Rubber bands, paint / ink / mist and junk mail

Hi there Bloglanders

I'm back at Hamman HQ and yesterday we had a public holiday down under in Sunny SA - more time for FUN!!

Of course, we had a "braai" on the "stoep", beautiful weather and lots of cold, white wine. And I had some time to watch Amy Tangerine's Design on Time video.  Her inspiration came from Tim Holtz - rubber bands, paint / ink / mist and junk mail.

My take:


As I didn't want to copy Jamie's idea of misting the rubber bands, I used this piece of scrap fabric as inspiration:


As the 15 minutes were not enough to sew, I stapled my cut-up rubber bands onto the background. It looked totally horrible as I've used craft cardstock (not one of my faves). Some mists, paint and ink and the mess just got bigger. Once again - 15 minutes and no time to re-do.  I just went on with the rest on some office copy paper, added it to the wet mess and mounted it on cardstock to get it less messy.

I left it to dry overnight and now it looks rather good. Still not my fave colour scheme - I'm not into naturals - craft and mustard are a big NO on my craft table. But I do think that the blue and purple mounting does make a difference. I love the film strip and are rather proud of myself for keeping it up and finishing the layout.

The more I look at it, the more I love how it turned out. Maybe in a few years, it would be one of my all time favourites!!

That's it from Hamman HQ. I'm off to get some office work done, photos printed and shopping. Watch this space and you will be the first to see. Thanks for looking at my blog today. Have FUN!!


Thursday, February 12, 2015

Amy Tangerine Handbook

Hello Bloglanders

I haven't forgotten about the non-edible Valentine Favours!! BUT, I started on  my Amy Tangerine handbook and it was SO fun ............ and I didn't do anything else.

Here is mine:


I really love it. You hop over to the Amy Tangerine Blog, sign up for the handbook, get it delivered to your inbox, print it and - the sky's the limit. Amy and Jamie show their versions on video. And for the very, very first time I used the "#" and Instagram!!!  It was SO funny - I asked my friend Google how it worked and a video came up.  The guy started the video with "so mum, this is how you do it". Made my day that I'm not the only one asking my friend's help.

I'll get back to Valentine's Day some time soon but in the meantime, page #2 is printed and ready to go.  Have fun and check back - I'll show once it's done.


Thursday, October 9, 2014

Print, Paint and Cut with my Silhouette

Hello

I can't wait to show you what I've done!!! I've told you that I'm doing Wilna's Art and Design course over at Big Picture Classes. It is totally awesome. The only problem is that I can't keep up. Goodness, the amount of freebies, handouts and videos. I don't think it has ever been done before.

Unfortunately I've never tried my hand at painting before BUT I quickly adapted my strategy to print, paint and cut with my Silhouette. Let me show you my finished project:


Just 3 steps:


1. Print on watercolour paper. Remember your registration marks!
2. Paint and let it dry.
3. Cut with your Silhouette.
4. Use in your projects.

Even mine looks like art!  I printed a stack and painted them over the weekend while camping. Now  I can just use it on layouts / Project Life / Cards.

And I;ve got another one to show:


I even made my own title by writing the word with a big Koki pen on office paper (yes!!! My very own handwriting), scan, trace and lift in Silhouette studio, filled the word with black and used the offset function for the white border, print and cut and it's done.

Here you can see my finished "artwork" made with Wilna's ampersand cut file and coloured with my watercolours.


And a closer look at the die cuts:

That's it!! I'm off to look at another video and will be painting the evening away once I've decided what to try out next. I did learn something new today. There will always be a way to do something - you just have to find it!!

Have a Thunderous Thursday.


Tuesday, August 12, 2014

Use your stash to make a Multi Media page.

Hello Bloglanders

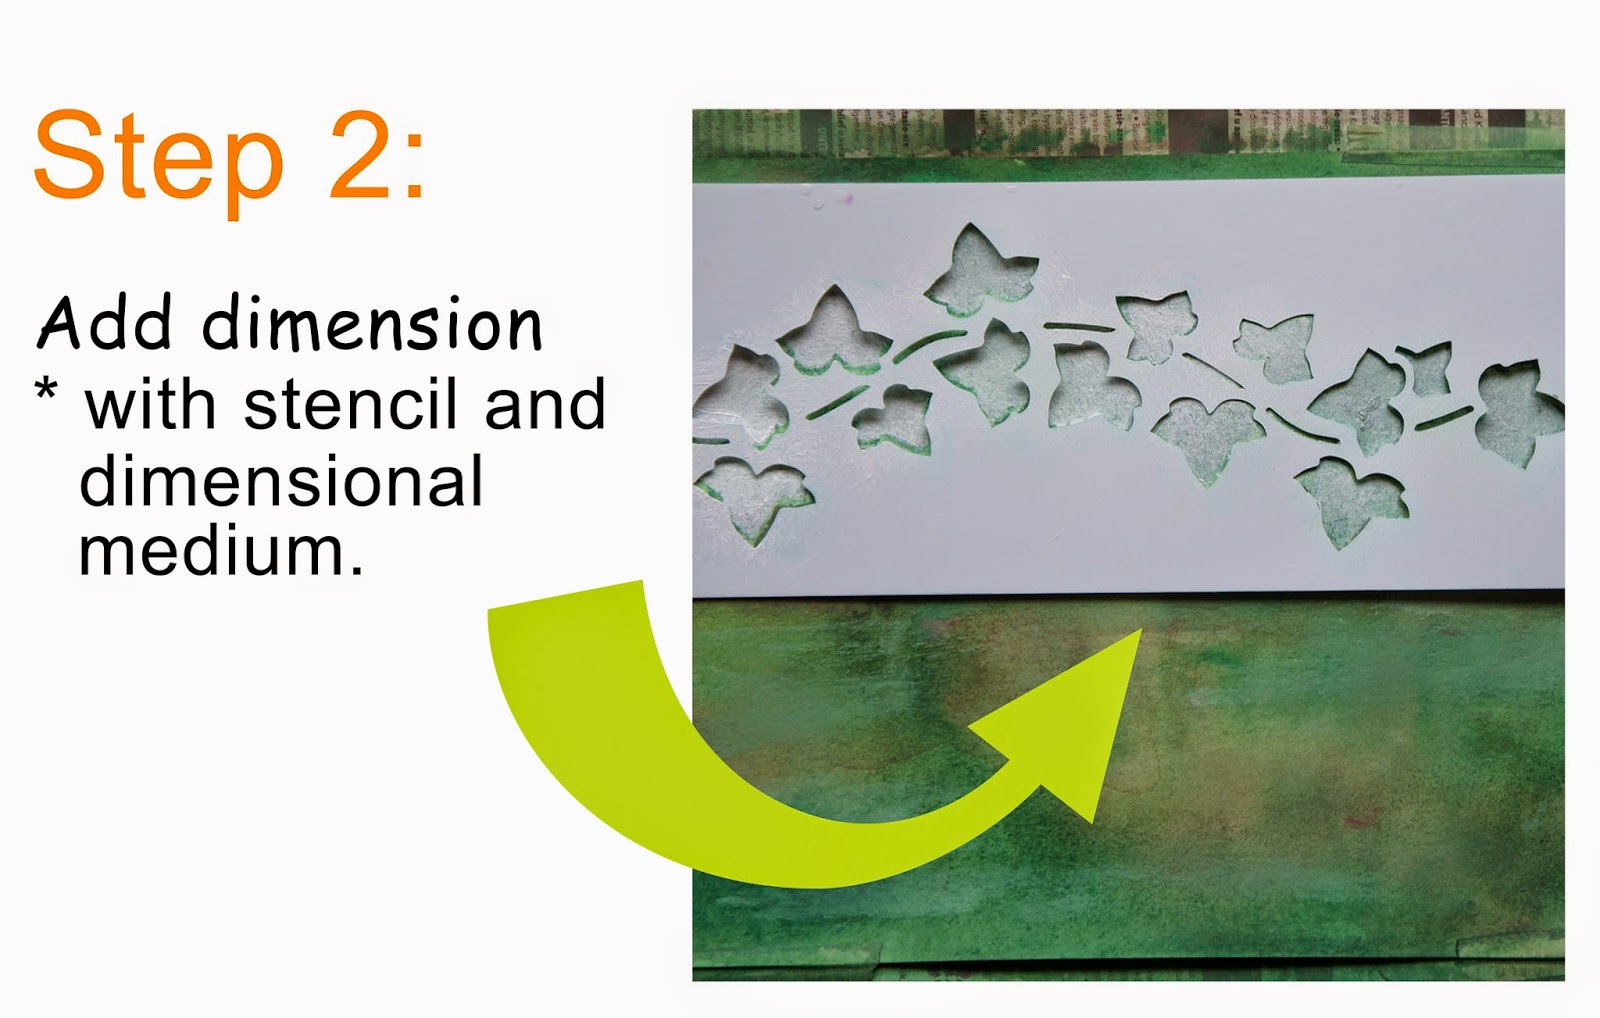
And as promised .................................. my second tutorial for the week!!. A while ago a friend asked me to teach a Multi Media class and I had to take some pictures for the hand-outs. So, I'm sharing my process with you!!


Make a Multi Media page using only what you have in your stash.

TOOLS TO GRAB:
Watercolor paper, paint brushes, cutting mat, scissors, ruler, glue, black pen.

How to:


You see, you can do Multi Media with what you've got!! And here is a list of the goodies I've used from my stash to create this page. If you want more specific info, leave me a comment and I'll gladly supply.

Stamps: Basic Grey (Stitches), Prima (Rondelle, Birds on Trellis), We R Memory Keepers (rose leaves); Die cut: Cuttlebug with Aquarius mini alphabet die from Letterpress; Paint: Acrylic paint from Jabtex in blue, yellow, orange, cream and brown, White acrylic medium; Ink: Ranger (Jet Black), Jenny Bowlin (Weather Vane); Stencil: from stencils.co.za (Ivy); Mounting paper: Very, very old from Creative Memories; Green and Orange coloring pens (left over from one of the children, don't have a clue which brand it is)

That's it from me. Thanks for looking at my blog and have a WONDERFUL day!


Sunday, July 20, 2014

Sunday Summary Week 29

Hello Bloglanders

And I'm back with a summery of my week. Still busy, busy, busy @ HQ Hamman.  First up - I did get some time to make a few cards.  My inspiration came from the SimonSaysStamp blog. The Monday challenge is "About a face". Now, I'm not big on cards or faces but decided to try it out and get some pressies made for my Xmas stash.


I've had this cameo embossing folder in my stash FOREVER but have never used it. In my quest for "waste not, want not", I decided to go through my stash and see what I can come up with for the challenge without buying anything. Actually, I found more than these to fit the bill. And a close-up:


Now for the upcoming wedding.  Finally, I'm at 7/8 of the bridesmaid dresses. Bridesmaid #8 is in Hawaii and will only be back in Sunny SA a week before the wedding - that one will therefore have to wait.


The girls do look great in their custom made gowns but I'm rather tired of black and still has to do something for the "mother of the groom" to wear. I did get an idea from my friend Pinterest:


I have enough fabric left over from the bridesmaid dresses to make this. Waste not, want not!! Of course I'll have to omit the white trim as only black is allowed in the winter wonderland wedding. Watch this space and I'll share my effort.

And this will become the name tags:


When our trees were cut back, we kept a few branches and Wynand sawed this into disks. Perfect for name tags. I have done some before and it looks like this:


I used these as table decor and afterwards added self adhesive magnet paper left over from other DIY projects and now they are fridge magnets!! Love them!!

I'm still in paint mood and while everything is out on my craft desk, I did a "spots and dots" page. 


You will see this one again - just keep checking back!!

Last but by no means least:


I did try something new!! To fillet a fish.  OK, please don't try your skills on baby hake like I did but still, it worked out wonderfully.  Wynand and I had a WONDERFUL fish and chips meal outside @ the pool. Love. love, love.

What more could you expect of an ordinary week. Food. Family. Occasions. Craft?? I love my life.

Thanks for looking at my blog. I'll be back to share some more crafting fun right here.

Have a wonderful week.


Thursday, May 9, 2013

Lovely Girl Art Journaling

Good morning Bloglanders

Once again it's a beautiful day in Sunny SA and the "world's biggest hybrid crafter" (that's me!!!) is back to share some crafting fun with you.  Why did I suddenly become the world's biggest hybrid crafter???  You know that I'm trying to sort out my house .......................... well, I have a lot of stuff and if you work in different mediums, you need some more stuff.  (that's my excuse to my husband) In short - I have more stuff because I'm the world's biggest hybrid crafter. That's it!

I had some painted fabric left over from another project.  Actually, it is from my Mother's Day file and there is a long story behind that one so we will share that at a later stage. First up - the painting of the fabric.  I mixed acrylic paint with water and painted and sprayed it onto fabric - that's it!! As I wanted a vintage feel - the colors were still too bright so I sprayed the whole "canvas" with some yellow fabric dye. (1 teaspoon dissolved into half a cup of boiling water, let it cool and put in a spray bottle). You have to let this dry thoroughly if you want to stamp on it like I did. After a few hours on the washing line, out came my stamps and ink. I think all the stamps that I've used are from MME and the ink is from StazOn.

Then I added a few pieces of leftover fabric and ribbon to my "canvas" and my project was finished.

Want to know how I did the die cuts?  I buy a product from my local fabric store that you use in applique. It irons onto the wrong side of the fabric, then I die cut my shape, peel back the backing paper and iron the shape onto my "canvas". No glue, no fuss.  For my hearts I've used a die from Spellbinders. Here it is in my beautiful, purple Art Journaling book:
And a close-up of my mini canvas:
Everything I've used came from my stash. And I found something out!  When I bought the black StazOn ink, I was told that I have to clean my stamps with a special stamp cleaner afterwards. So I bought that as well and its very, very, very expensive and a huge mess. So, this time I kept a wet cloth next to me on the craft bench and after I stamp, I wipe the ink off.  Works like a charm. My stamps look better than the ones cleaned with the stamp cleaner!

That's it from me.  I'm off to run some errands, do grocery shopping and then start on the new curtains for my dining room.  Thanks for hopping to my Blog. Please come back to play as I'll have some more crafting fun to share right here. Have a Terrific Thursday!


Thursday, May 2, 2013

Storage Boxes

Good morning Bloglanders

Yesterday we had a public holiday in Sunny SA and I spent the day working on my house - painting, making curtains and thinking up some crafting fun.  I went through our paint stash and you can't believe how many left overs there is.  I decided right there and then that they will be USED. The lighter colors will become undercoats for other painting projects but the rest will be utilized as they are.

Some time ago I pinned these beautiful storage boxes:


According to the pin it comes from this website but I couldn't find it so I just kept the pic on my Pinterest board.

3 May 2013: My good friend Sandra sent over the link. You should see this!  Just click here.

It is totally adorable but I'm far too stingy to use my beautiful scrapbook papers to cover boxes so out came the leftover paint and this is what I have now:
And this was what the boxes looked like before the paint hid them:


I can't believe that I've had them like this for the past 5 years and just didn't go the extra mile to paint it.  It took me about 5 minutes to do and I totally love them. You can see that I've swopped the lids around - IMPERFECT ME!!

That's it from me. Thanks for visiting my Blog and please come back as I'll be sharing some more crafting fun right here.  I'm off to do some pretty labels for my newly painted boxes!  Have a great day!