Showing posts with label Craft Storage Ideas. Show all posts

Sunday, September 20, 2015

Sunday Summary Week 38/2015

Hi there Bloglanders

I hope you are having a wonderful weekend!! It's S-P-R-I-N-G down under in Sunny SA and we are spending LOTS of time outside.

We were invited to dinner and to watch the Worldcup rugby match between the Springboks and Japan at a friend's house. I decided to make cheese straws. The recipe is from a local TV show "Siba's Table". It was SO easy to make and it tasted yummy. You can see the recipe here and watch a video as well. Enjoy!! I love Siba's recipe's!

Here is my version:


I Stitched a baking paper pouch and tied it with sting. It looked SO homemade and it's perfect to put on the table for the rugby crowd. No dishes to do afterwards!

All the children joined us for brunch at a nearby wine farm. It was wonderful outside and I loved having them over.


I had the crumpets with Brie, bacon, pear, cream cheese and blueberry jam. Delish! Sorry, I couldn't wait to tuck in - my picture was taken after I've finished off about three quarters of the plate.


And I made a video of pictures of my garden. I can sit outside and look at the flowers all day long ..............

You can look at the video on my Instagram feed.

And we went camping. Wynand is always up for some fresh air, lots of rest and the great outdoors. I eat, read, sleep and think up some creative ideas.


This week I had a GREAT post over at Craft Storage Ideas.  All about traveling with your kids and their crafts.  If you missed out - head over there and see for yourself.  I'll be trying out one of the ideas myself and will tell you all about it right here on Play as U GO. Want a peek?


On that note - thanks for looking at my blog today. Have a wonderful week and please check back as I have lots more to share right here on Play as U Go. In the meantime, have FUN and try something new - TODAY!!


Sunday, August 2, 2015

Travel with your Crafts - Making Softies

Happy Sunday Bloglanders

I hope you are having a ball and that your weekend-dreams exceed your wildest expectations.  Currently, I'm making Softies. Never heard of them??  Check out my Pinterest board.

As I had to do a Craft Storage Ideas post about storing new trends, I thought I'd give this trend a go. And meet them - Maya the Bee and Flower Power. Initially I decided to make the bee for a garden loving friend but as she is more of a pink person, I decided to give the trend a second go with Flower Power.


I'll show you exactly what I did in another post but first I want to share how I travel with my crafts.  Wynand and I hop between our home in Stellenbosch and the winery on the West Coast quite regularly. Nothing better for me than sitting on our "stoep", drinking Sauvignon Blanc and CRAFTING.

Here is what I used:


A whole stack of old suitcases stacked in our entrance hall. The bottom one dated back to my first day of school, the bottom brown one is from my daughter-in-law's brother, then another brown one from Wynand's first years of school. On top you can see the bright, blue striped one that I retrieved from our attic recently. Pieter used it in pre-school more than 25 years ago!!

As I love to try out new things, I needed a space for non-permanent projects.  And this is IT!!

I decided to make a cover for the inside as I needed pockets for my tools. Step one: Cut pattern pieces using the suitcase as a template. Remember to add seam allowances!


I used fabric scraps (what did you  expect???) therefore my pockets and backing are different black tartans, leftover buttons and an old shirt from my mum for the flowery piping.

Stitch and it's done:


Even though it wasn't necessary, I wanted brightly colored bows to keep the cover in place. I've sewed them to the stitching that go all around the suitcase.

 And packed with all the tools and products needed to make gorgeous Softies:


I love the fact that everything is in one place and that I can just open up the suitcase and get going.

I hope you enjoyed my version of  "Travelling with my Crafts".  I'll be back with a "Try a Trend" post. Then, I'll share the info on making your own Softies.  In the meantime, I'm off to try my hand at a Butterfly. Check back and I'll share the inside info right here on Play as U Go. If you can't wait, check my Instagram feed and you will see as I go.

That's it - I've got a butterfly waiting to be made! Have a Happy week and thanks for looking at my blog today.


Friday, July 24, 2015

Travel with your Crafts

Happy Friday Bloglanders

I hope you are having a ball and that your weekend-dreams exceed your wildest expectations.  Currently, I'm making Softies. Never heard of them??  Check out my Pinterest board.

As I had to do a Craft Storage Ideas post about storing new trends, I thought I'd give this trend a go. And meet them - Maya the Bee and Flower Power. Initially I decided to make the bee for a garden loving friend but as she is more of a pink person, I decided to give the trend a second go with Flower Power.


I'll show you exactly what I did in another post but first I want to share how I travel with my crafts.  Wynand and I hop between our home in Stellenbosch and the winery on the West Coast quite regularly. Nothing better for me than sitting on our "stoep", drinking Sauvignon Blanc and CRAFTING.

Here is what I use:


A whole stack of old suitcases stacked in our entrance hall. The bottom one dated back to my first day of school, the bottom brown one is from my daughter-in-law's brother, then another brown one from Wynand's first years of school. On top you can see the bright, blue striped one that I retrieved from our attic recently. Pieter used it in pre-school more than 25 years ago!!

As I love to try out new things, I needed a space for non-permanent projects.  And this is IT!!

I decided to make a cover for the inside as I needed pockets for my tools. Step one: Cut pattern pieces using the suitcase as a template. Remember to add seam allowances!


I used fabric scraps (what did you  expect???) therefore my pockets and backing are different black tartans, leftover buttons and an old shirt from my mum for the flowery piping.

Stitch and it's done:


Even though it wasn't necessary, I wanted brightly colored bows to keep the cover in place. I've sewed them to the stitching that go all around the suitcase.

 And packed with all the tools and products needed to make gorgeous Softies:


I love the fact that everything is in one place and that I can just open up the suitcase and get going.

I hope you enjoyed my version of  "Travelling with my Crafts".  I'll be back on Sunday with a "Try a Trend" post. Then, I'll share the info on making your own Softies.  In the meantime, I'm off to try my hand at a Butterfly. Check back and I'll share the inside info right here on Play as U Go. If you can't wait, check my Instagram feed and you will see as I go.

That's it - I've got a butterfly waiting to be made! Have a Happy weekend and thanks for looking at my blog today.


Wednesday, May 20, 2015

Planner Page with Design on Time

Hello Bloglanders

Happy Wednesday to you all!! Today I'm sharing the latest Design on Time project - washi, post it note and magazine.  While I was watching the video, I had my planner open to jot down the "ingredients" and it just evolved into a Planner Page.


As you can see, I'm still into fruity colours.  I love the pineapple post it note (behind the photo) and took it as the inspiration for my page.  As it was one of my New Year's resolutions not to buy magazines, I opted for "this is the year" from Pinterest.

"This is the year" is a divider page and I move it around as needed. A good idea is to use two strips of washi back to back. That way you get the washi effect but it doesn't stick to your page.


The divider page even has a pocket - perfect for hidden journaling (and a movie stub). Beneath it all is a lot of "to do's", appointments and journaling.


Here you can see what's beneath the post it note.

And the page to the left of the divider:


I love it when my planner looks like me - dreamy, wild and a once-off!!

That's it. This project only took 10 minutes as the only things I added were the divider page, post it note and photo. I can't wait for the next Design on Time challenge.

Something else:  For those of you who love to sort your stash, I'm over at the Craft storage Ideas blog with a post called "Locker Love".  I did have a hidden agenda when I wrote the post - D R U M R O L L !!!!!!!! I'll be moving my whole fabric stash into lockers. YES, we have some empty storage space and it would look SO pretty and neat if I can fill it up with lockers. You will be the first to see ........................ of course!! And here is an appetizer of my CSi post and also my FAVE idea.


Thanks for looking at my blog today. I'll be back with a mini book for Magazine Monday later this week. Check back and all will be revealed.


PS. The post it note, mini alpha stamp set,fruit stickers and pineapple embellishment is from Typo.

Saturday, May 16, 2015

BIG news over at Craft Storage Ideas

Hi there Bloglanders

I just LOVE being a Craft Storage Ideas contributor!! Head over there to see the BIG news. Just click here.


I'll be back tomorrow with my Sunday Summary. Please check back to see what's on my crafting table. Have a happy, fun-filled, crafty, scrumptious Saturday!


Monday, March 30, 2015

Sunday Summery Week ???

Hello Bloglanders

And I finally lost track of the weeks!! I think I skipped some Sunday Summaries as I went to see my mum for three consecutive weeks. If you keep in mind that she lives about 4 hours drive away from me, it's no wonder I lost a few weeks.

I received beautiful flowers.


And I cooked breakfast.


I call them oven omelets. Line a silicone muffin pan with thinly sliced ham. Add everything you like. Top with beaten eggs and seasoning. Bake until brown and puffy. Easy Peasy!!

Pieter and his Princess moved into their very first own home and I had to do the curtains - 45 metres of black velvet. I'm not saying anything else!! Lucky me - my neighbour's cat is keeping me company.

 As we stayed at the beach house while visiting my mum and had wonderful evenings on the "stoep" (=porch) with beautiful scenery, cold West Coast Sauvignon Blanc and a braai. (=barbeque)


The sea, the moon - I just love this picture!!

I'm a HUGE fan of Wilna Fursternberg. Last week she did her first art journaling page - YES, her first ever!! She is a wonderful artist and as I had some time on hand, I decided to join in the fun. Of course mine is nothing compared to her work of art but I had a ball and enjoyed her video immensely. I even showed it to my mum on the iPad - she could not believe what you can see and  hear via technology.

Here is my page:


You can watch Wilna's video here. Of course I'll be adding some journaling but I thought I'd keep that private.

I received these cat post it notes a few weeks ago and as I'm a HUGE cat lover, I made a home-made planner ruler from recycled packaging material and added the kitty cats to my planner. They do make me smile.


On the left is a quote from Amy Tangerine. I've printed them x4 and they are all over my desk, planner and files.  It does help to remind myself that I should do something purposeful every day.

And our Princess had a birthday!! I do love her and the boys to bits.


And now for the winner of the Craft Storage Ideas Blog Hop prize that I offered on Play as U GO.

Here it is:
  1. OMGosh!!!
    What a F U N, Colorful, & UNIQUE Planner System!!
    THANKS for Sharing!!!
LChippy76 please send me your email address (playasugoblog@gmail.com) and you will receive the free Planner Printable.

That's it from me!! I'm off to get some more crafting done. Have a wonderful week and thanks for looking at my blog today.

Monday, March 23, 2015

Craft Storage Ideas Planner Blog Hop


Hello to all my regular Blogland readers as well as my special guests today – the ones visiting for the Craft Storage Ideas Planner Blog Hop. Thanks for Hopping along. You should have come from Amanda Corbet’sblog.

We are so excited to share some great ideas for keeping your planner both organized and fun along the way. But first, I want to share some FANTASTIC PRIZES we will be sharing with lucky commenters along the route!

·        TWO winners will receive 50$ Gift Certificates from OrganizeMore to pick out your fave organizer!
·        One winner will receive the following 3 stamp sets from V’s Sweet Ideas:
·        One winner will receive the Scheduled stamp set from The Ton Stamps!
·        One winner will receive a collection of planner stickers from MareBear Crafts on etsy!

To win, simply comment at each stop along the way. You do not have to comment on every stop to win, but it sure increases your chances! Also, we are sorry, but winners must live in the United States, as international shipping is just too pricey.

And now for my Planner Story. Get some coffee and away we hop!!

I’m not new to Planner Planet – I’ve been keeping a planner while at school, university, raising the boys (in those days we called them diaries!) and even now I can't live without it.

I note “to do’s”, events, menus, interesting facts, things that happened, quotes, inspiration and motivation.. My planners are like mini scrapbook journals and I can report back on things that happened 20+ years ago. Here you can see my Planner stash from the past 5 years.


 I have a very, very old Planner cover and my inserts are the cheapest A6 page-a-day that’s available. My motto is not to spend ANY money on Planner goodies and to keep what I use most on my desk neatly filed away.  I use photos, paper scraps, washi, paint, stamps, die cuts, stencils,  Sticky notes, pens and highlighters for my planner pages. Want a peek inside?


Mostly my pages are representative of what is currently on my craft desk / happening in my life and once the year is over, I file my pages away in a handmade, creative cover and a brand new year goes into the Planner cover.

Enough of my planner as I came here today to show you how I keep my planner goodies on hand.  Let me show you the outside of my planner goodie file: 

It’s a very, very old A5 file that I covered with hand dyed scraps left from this project. On the front I have “GENIET” (= ENJOY in English) – that’s my little word for the year and I like to remind myself not to take life so seriously.

Let’s start with my inside cover pages. The front has pens, highlighters,a ruler and a paint brush. The back has a slot for a notebook and inside the front and back covers, I stash some journaling cards, watercolor paper and additional notes and stickers.


 Now we are getting to my Planner stash:

STICKERS

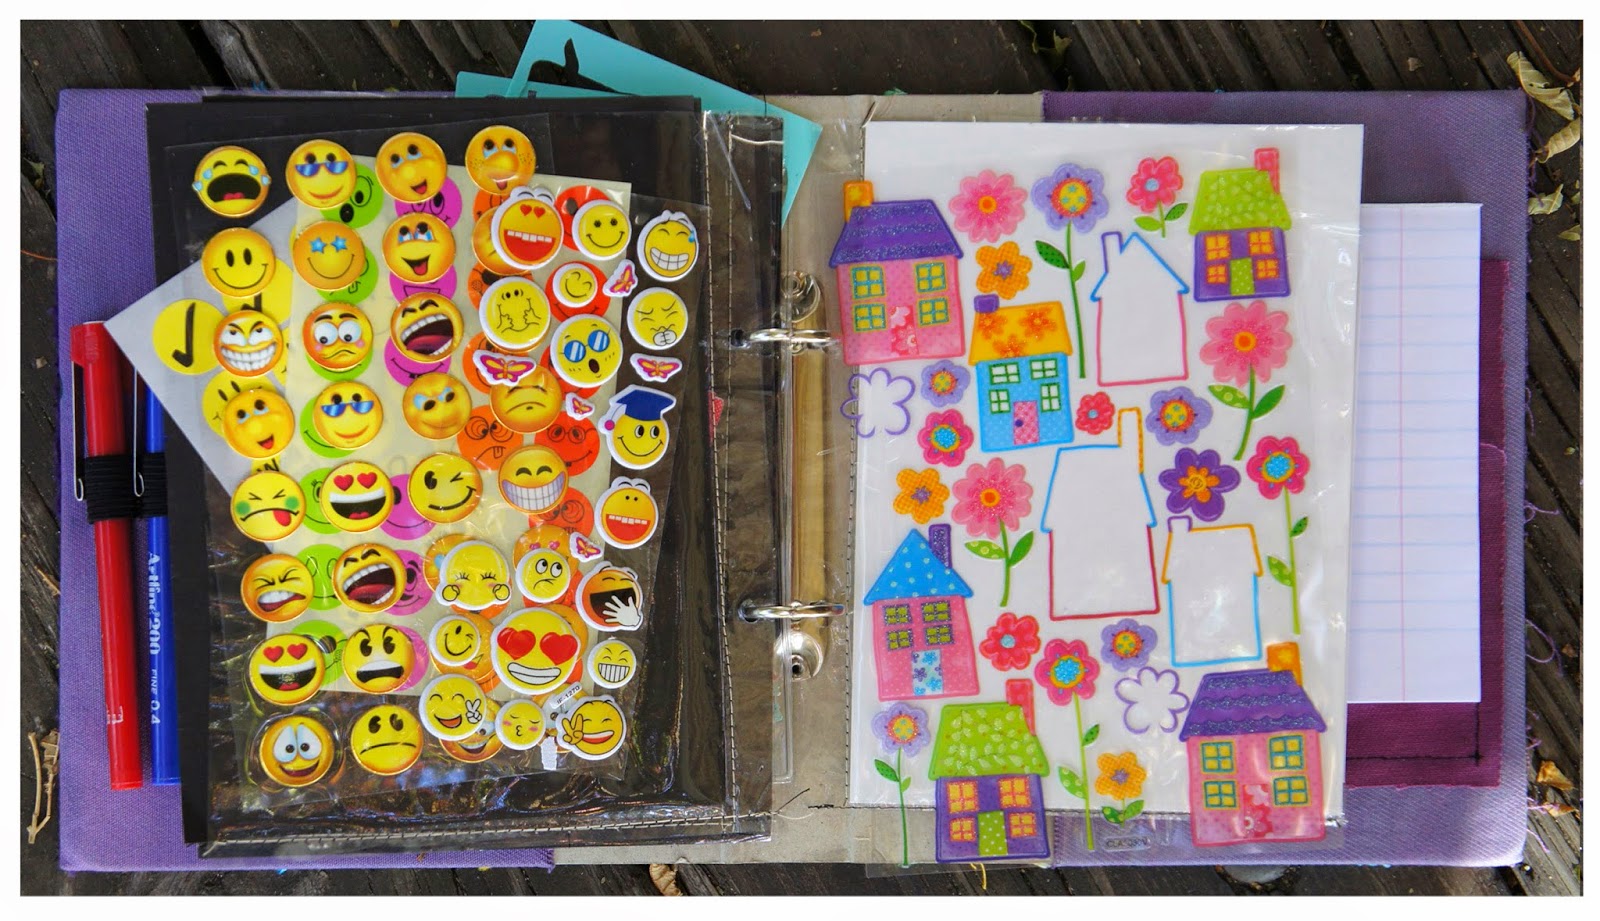
Just bits and bobs from my stash that I love to have on hand. I made the “page protectors” by stitching book cover plastic onto cardstock and punching holes for the binder rings. I’ll put up a post next week to show you exactly “how” to.

DIE CUTS

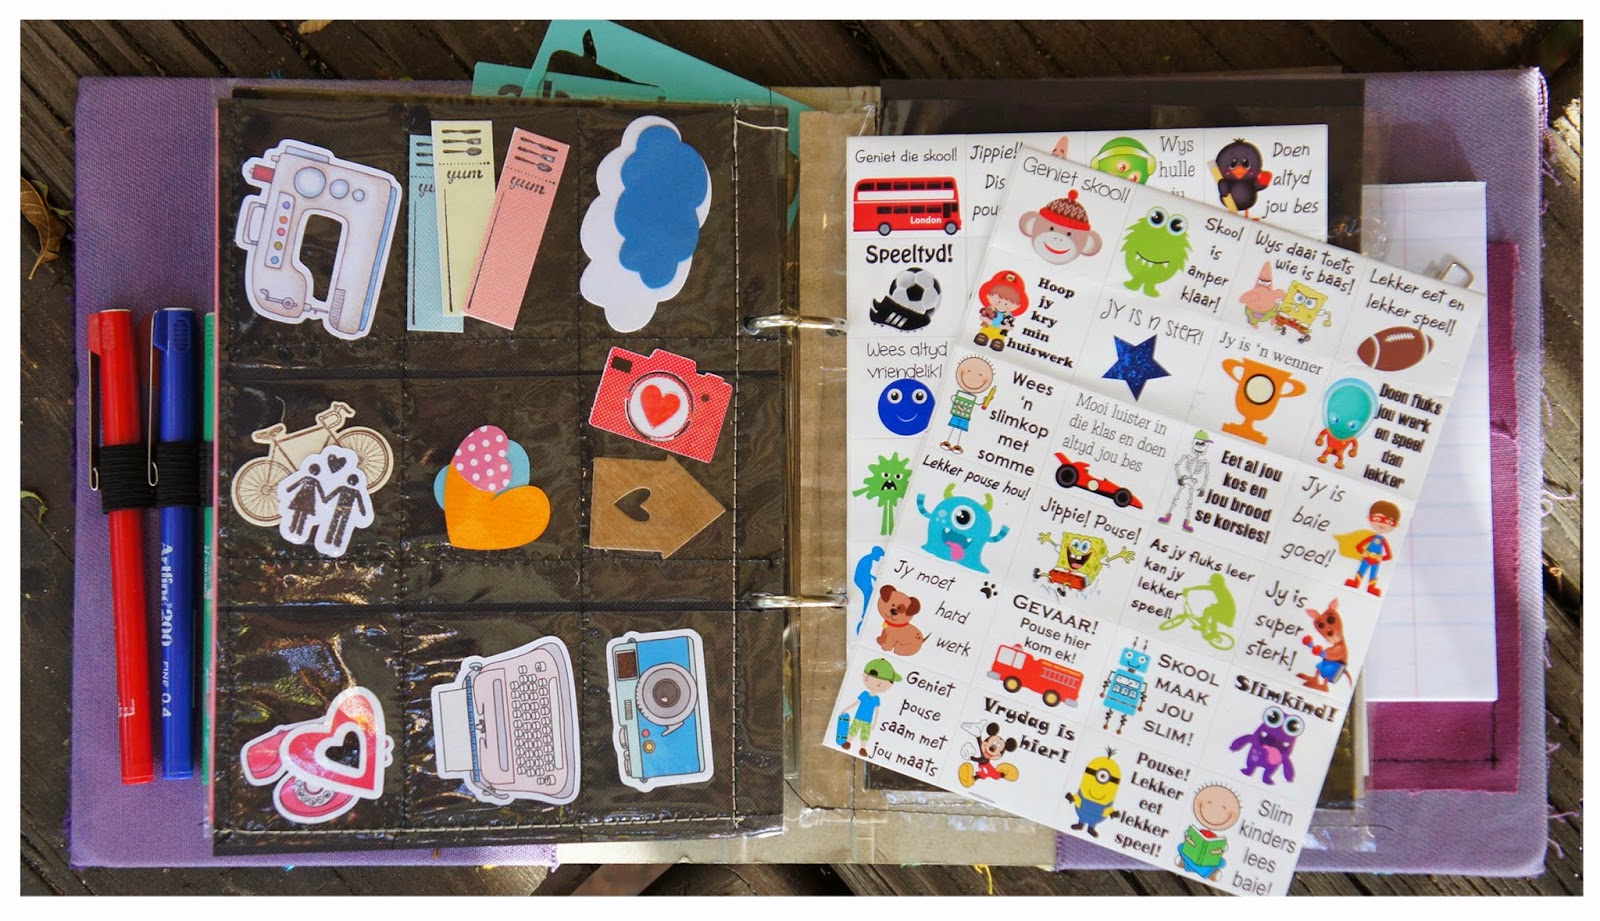
Mostly leftovers from my craft desk.
  

PAPERCLIPS

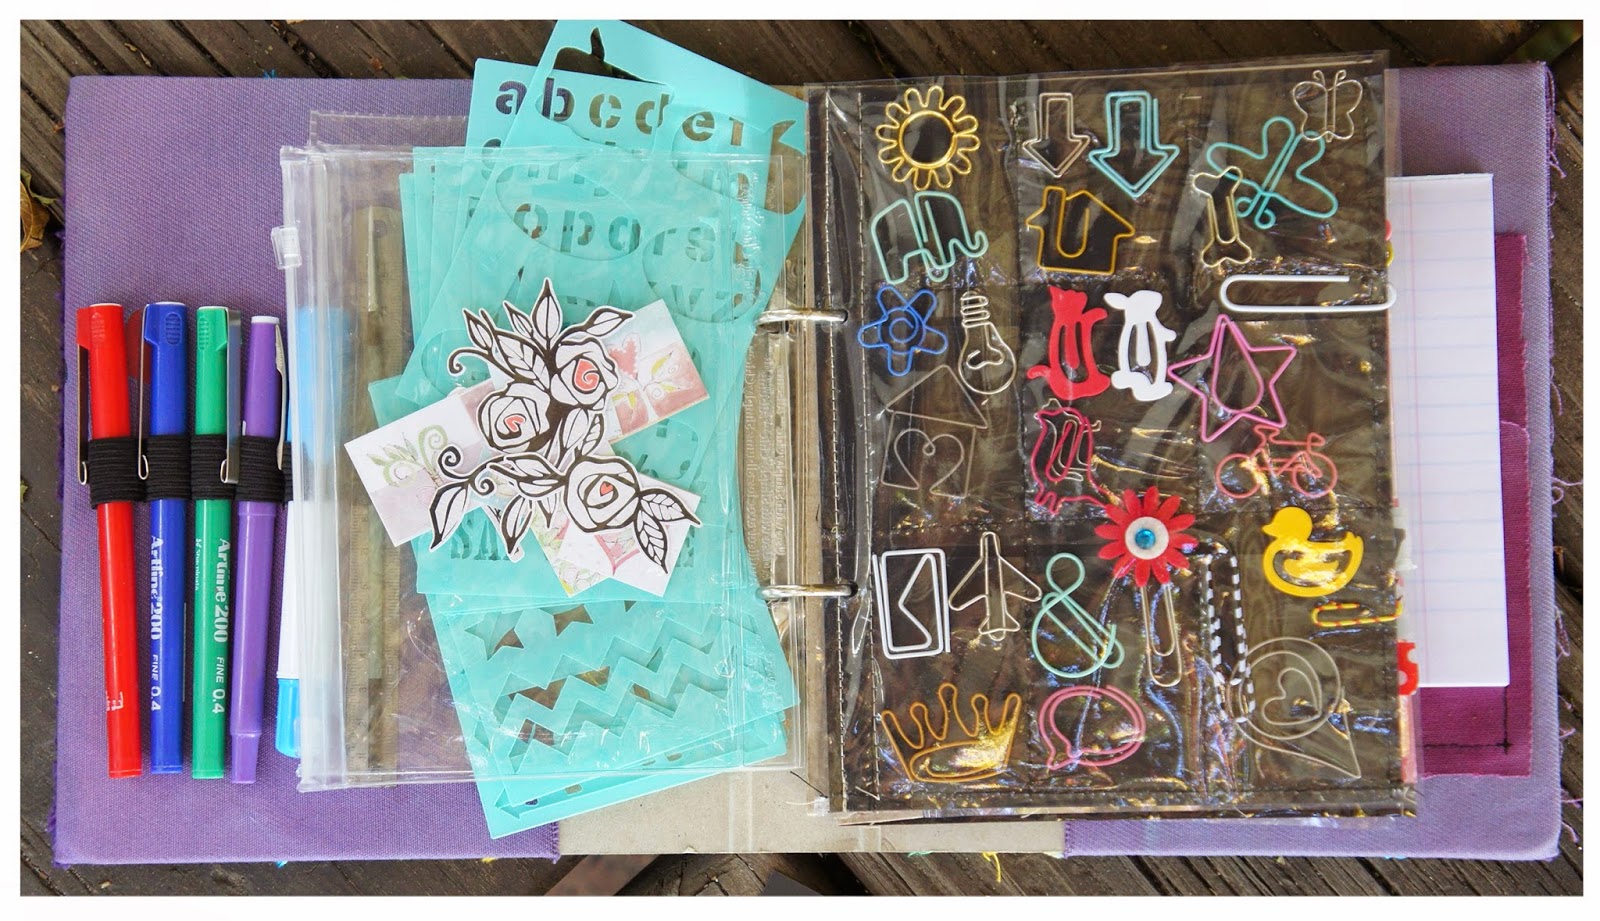
Once again, a handmade “page protector” filled with paperclips from my stash. I love to use them in my planner, on "emergency cards" and in my Planner file.

 STAMPS

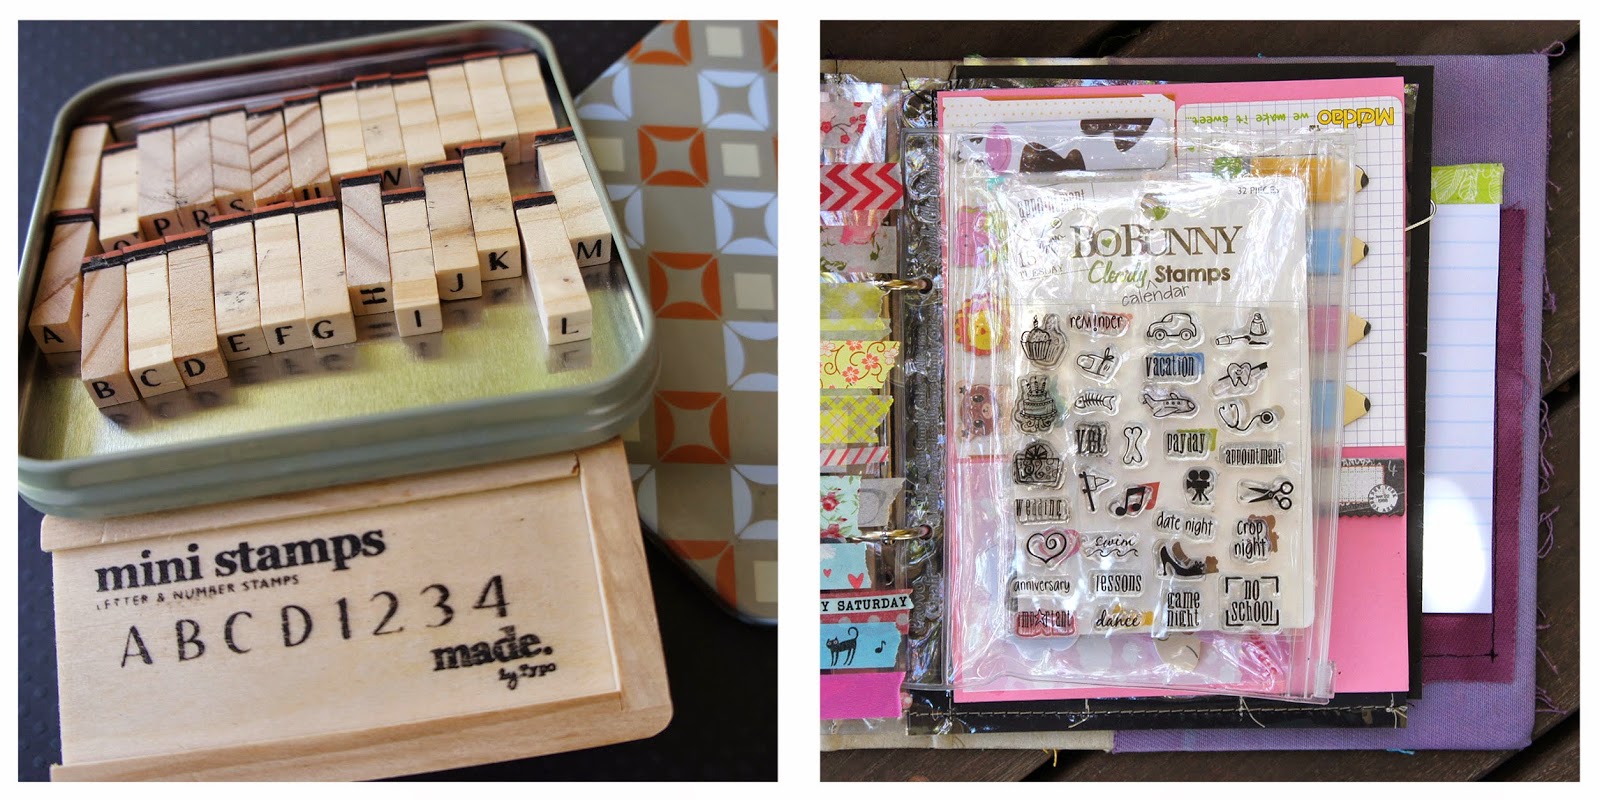
I have only one set of planner stamps and an alpha set in my Planner File.  I do love the little wooden alpha set that I bought locally and use them A LOT as I despise my own handwriting! They are kept in a small plastic zipper bag that I recycled from somewhere. The original alpha set came in a little wooden box but I opted for a gift card tin as it's much slimmer and fits into the zipper bag with the planner stamp set.

STICKY NOTES 

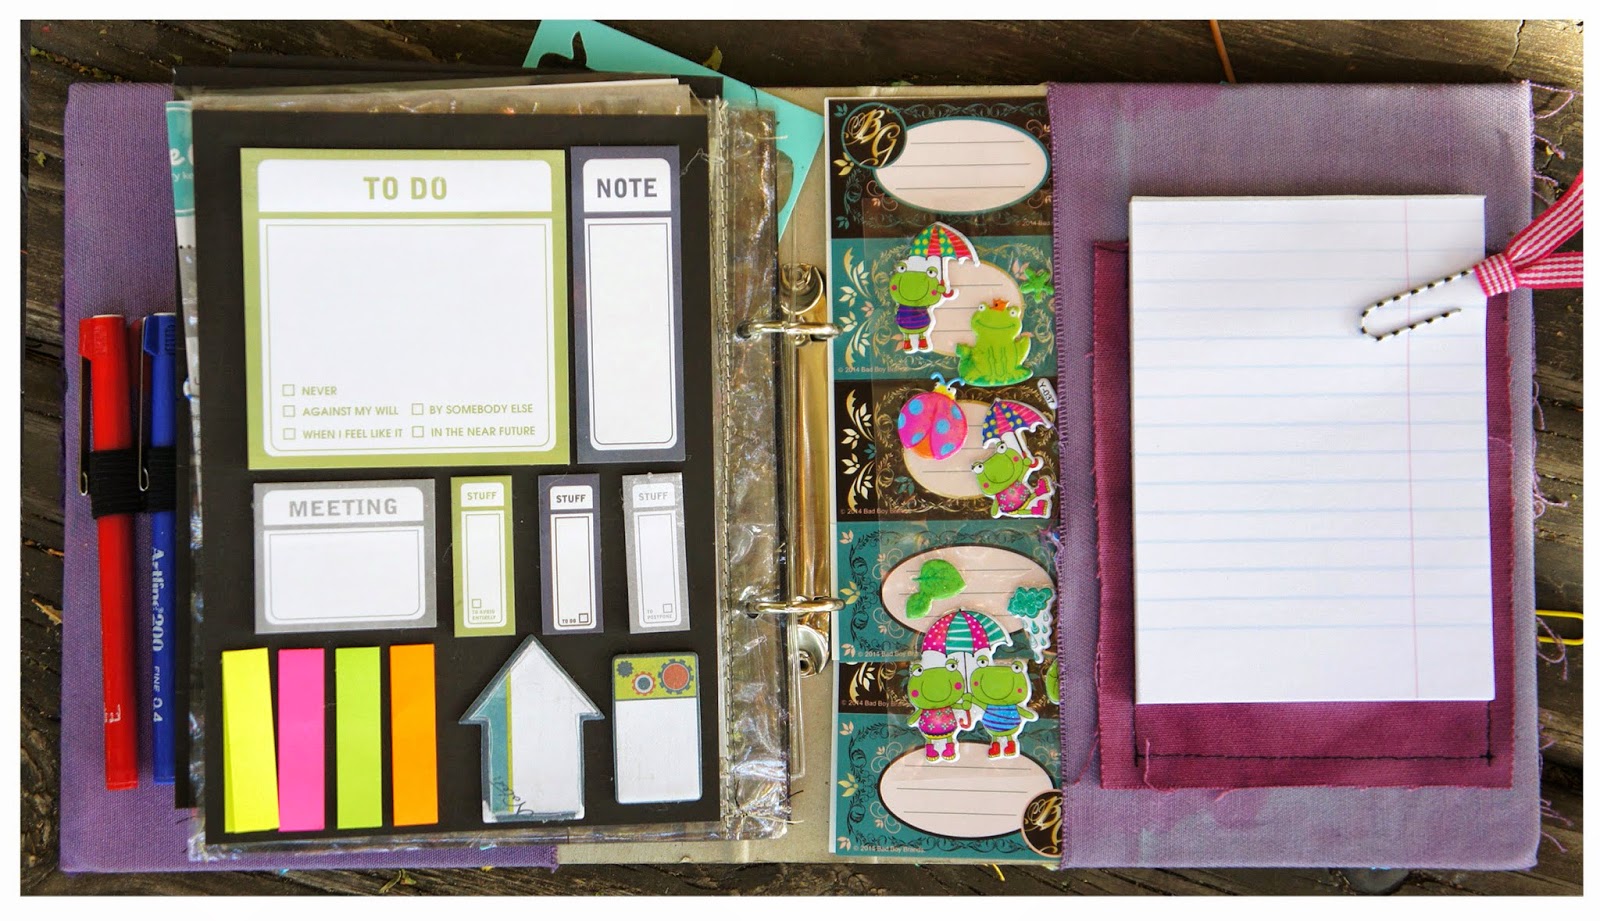
I gathered them from all over – the office, my craft stash and even swopped some with family and friends. Only 20 pages of each variant go into the file - the rest stays where they are. If you add more, the file becomes too bulky.
  

WASHI

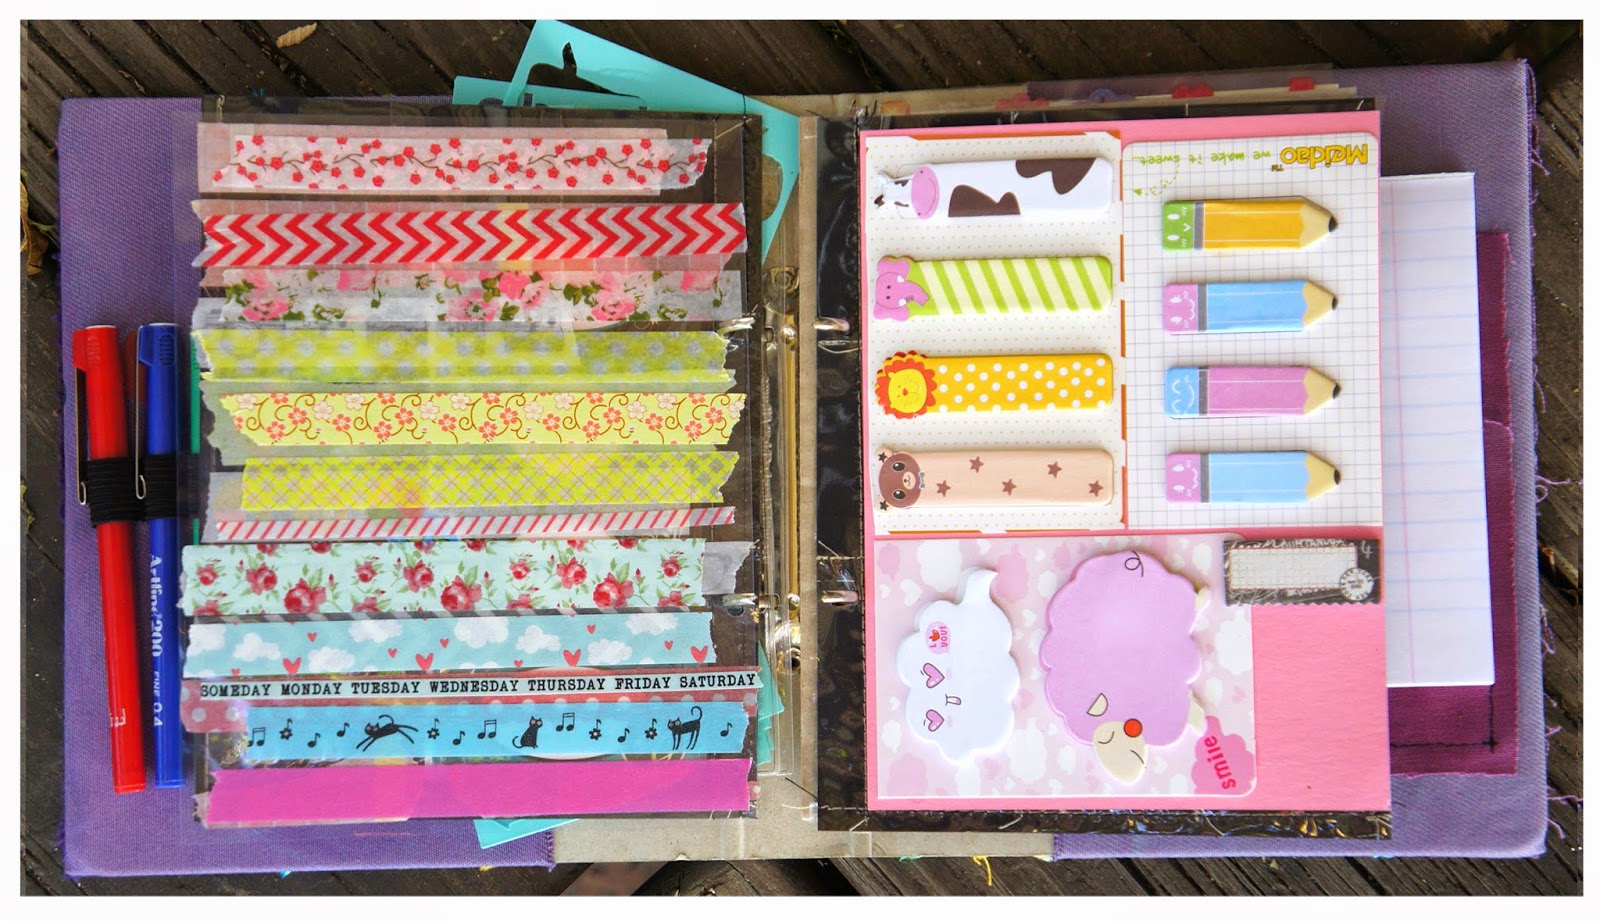
I love to use Washi and what better way to make “flip-up’s”/ reinforce binder holes / divide pages?? I have an A5 acetate sheet and I just add strips of washi to it. Easy Peasy!!

STENCILS

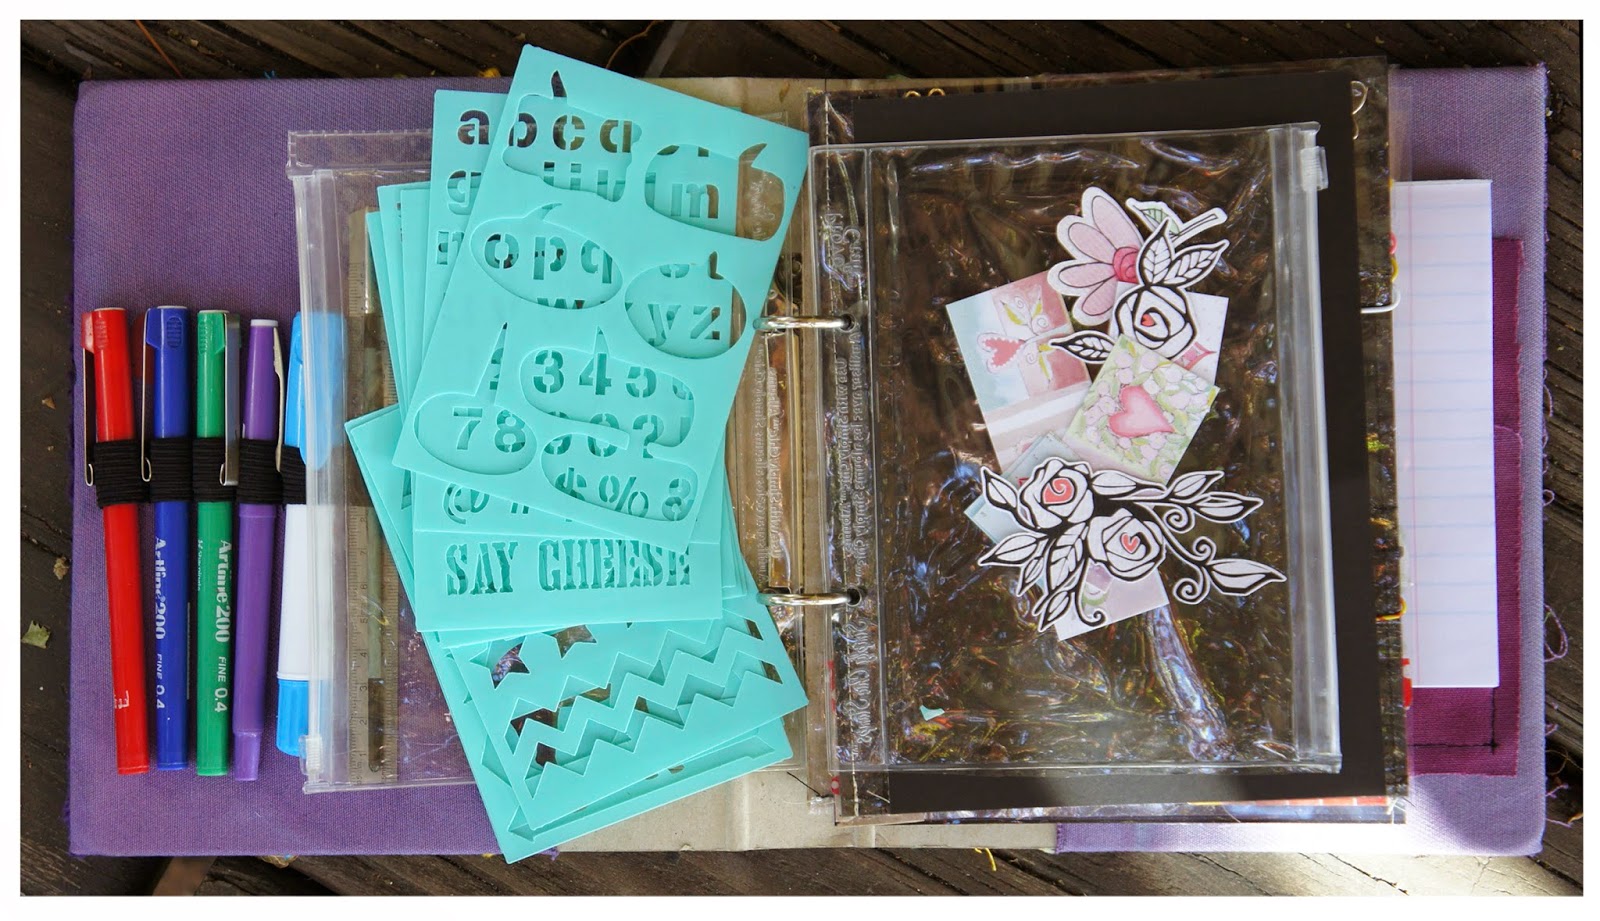
A mini stencil set in another of the recycled plastic zipper bags.

STATIONARY

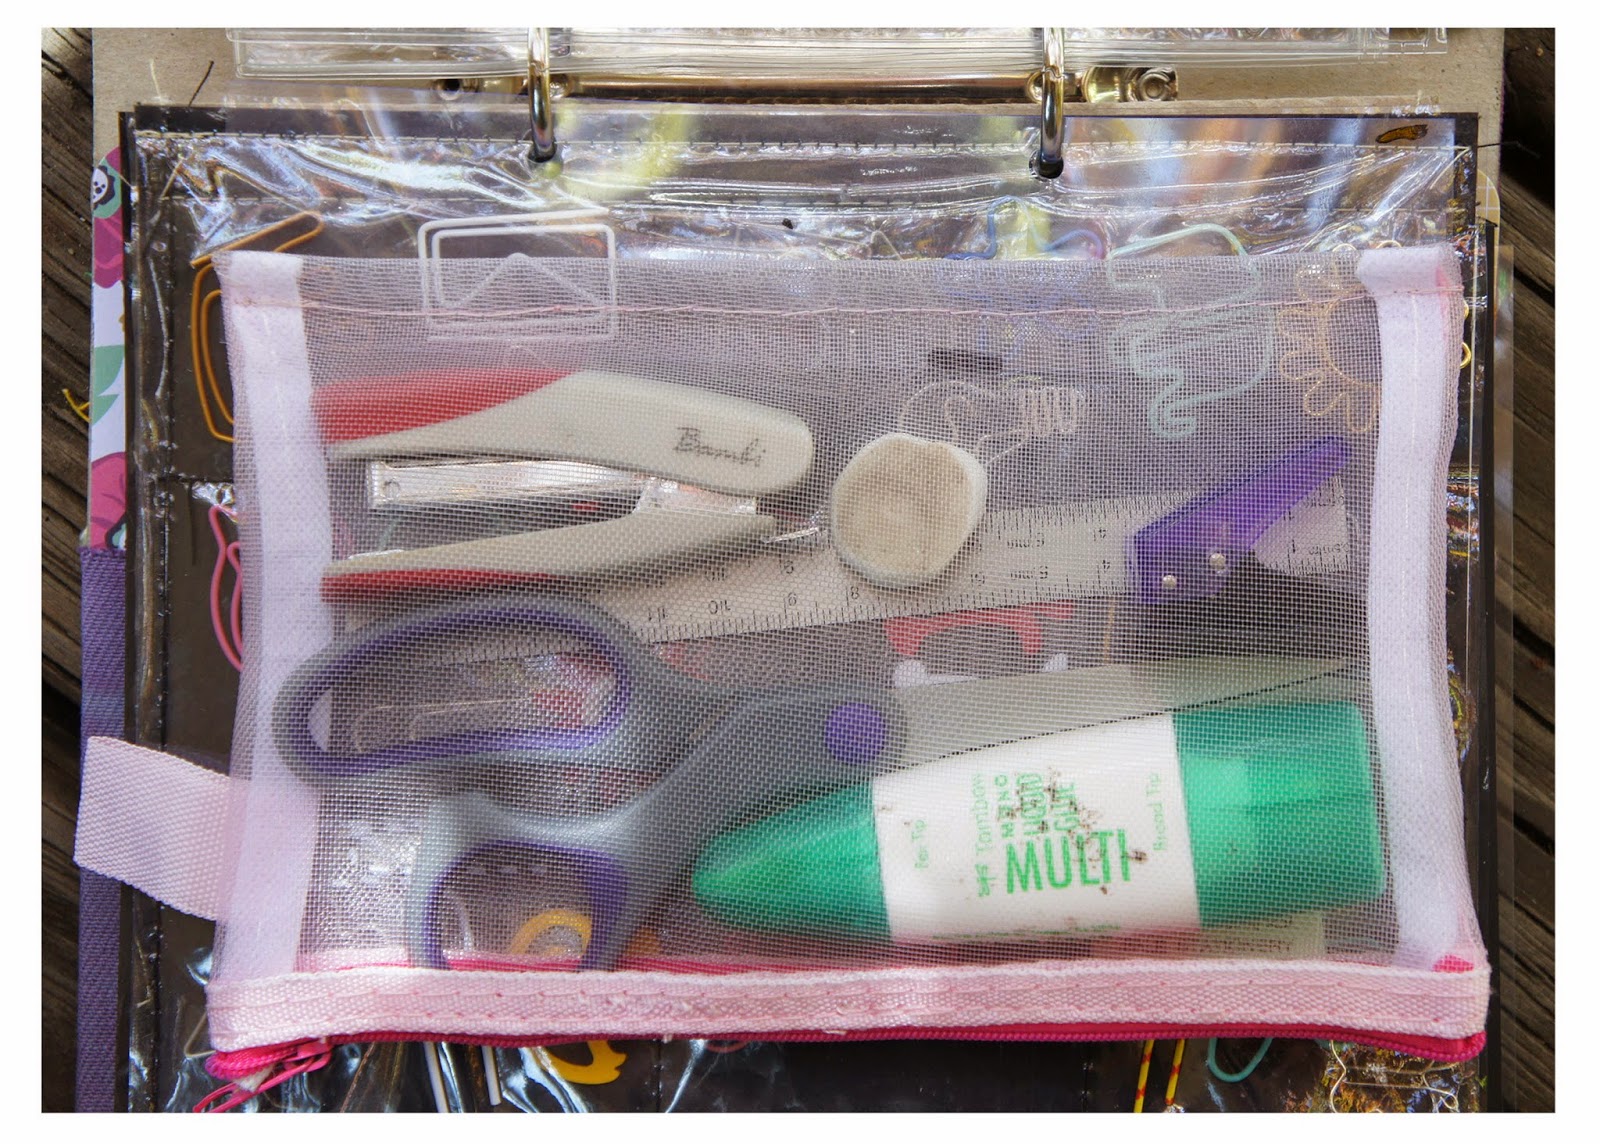
Wherever I go, my planner and Planner File goes and so does some stationary. I’ve sewn a spine onto a fabric pencil case and it goes into the file with the rest of my Planner goodies. In here are scissors, glue, a ruler, a hole punch (from a Christmas cracker!) and a small stapler. I have a similar bag for paint goodies.  What better than to paint / draw / write a bit when you have time on hand? Sorry, I forgot to take a picture of it!!
  
That’s it – my Planner File for keeping everything that I need and use together, neat and out of the way while at home / traveling. If you have other systems for storing your planner goodies, let me know in the comments and one of you could win a digital set of planner stickers by AlexScissorhands.


As this is a Digital File, my freebie is available to everyone. YES, even you down under are welcome to enter!!

You are welcome to play along on Instagram. Just tag your Planner Pics with #plannerplanet and your storage ideas and solutions with #craftstorageideasblog. We would love to see and hear what you do!!

Thanks so much for stopping by! Have fun, get Planning and remember to try something new. Next on the Hop is Jessica Frost-Ballas’s blog.