Showing posts with label Notebook. Show all posts

Sunday, November 27, 2016

Journal cover

Happy Sunday Bloglanders!!

I had a wonderful weekend. One son left for Canada, I'm "babysitting" his cat and the other one is moving to a nearby town. Busy, busy, busy.

And I've made sure that I have some crafting FUN as well. A cover for my journals!!


After seeing a video on YouTube, I decided to do my December Daily in a notebook format this year. BUT, I already have one in progress for my Thank-You-Journal on my desk. Getting a bit all over the show. So I decided to make a cover to keep everything together. I totally LOVE the Christmas Cat fabric!!

Wanna peek inside?

On the left is a pocket made with some more Christmassy fabric and on the right my DD. Not done yet but ready for action.
On the left is the back of my DD  waiting to be decorated and on the right my nearly finished gratitude journal. If you missed out on all that fun, just scroll down to my previous post and read all about it.
And last but by no way least I have a brand new one that will become my summer vacation notebook. Remember, down under it's SUMMER and HOT!!

You will see all of them right here on Play as U GO again. Just keep checking back and all will be revealed.

And a bit of detail:

I've added 2 colourful buttons to the front of my cover - my inspiration came from the SimonSaysStamp Monday challenge - Trio-Tastic and I even added 3 bookmarks. The trim and buttons all came from my sewing stash. Totally love seeing and using them all the time.

Wanna make one yourself?

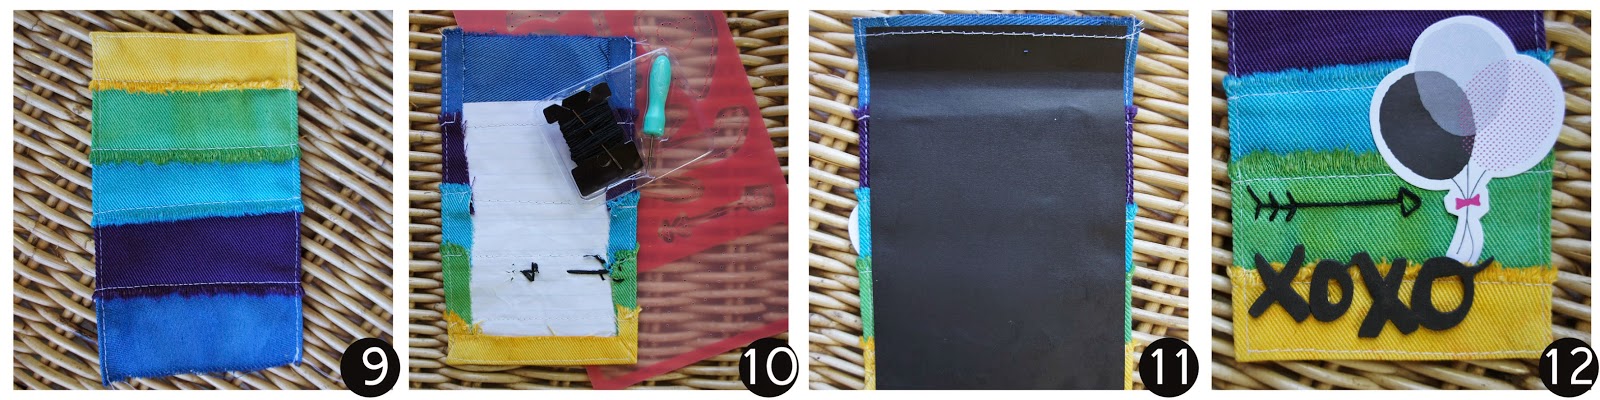
1. To get the size, I stacked 3 journals and folded a piece of copy paper to fit over it.
2. I added about 1 inch to the length of the copy paper and my pattern is made.
3. Zig-zag some stiffing onto the back of iron-on-batting. I made it about half an inch smaller all around and even made a "spine" for my cover as it will become bulky when  my journals fill up. For stiffing I've uses mosaic backing - I'm sure you will get something similar in your local fabric shop but this works very well and I use it in lots of sewing projects.
4. Fabric for my front cover ironed onto the batting.
5. Lining for my inside cover.
6. Pockets for the front and back flaps. I can add 2 more journals here should I need to. 
7. Elastic to keep my journals from falling out.
8. To the front cover I've added the buttons and some more elastic to keep my journals from falling out and my memorabilia safe.
OK ...................................... I forgot to take a pic!! Just sandwich the front and backs together and pipe all around.
DONE.

If you want  more detail ............................. leave me a comment below and I'll gladly answer / give more info.

I totally love it!! Think I'll do some more in different sizes and even a few for very, very special Christmas pressies.

Thanks for visiting my blog today. Have a happy week and please come back to play. Remember to hop over to SimonSaysStamp's Monday Challenge to see the rest of Bloglands Trio-Tastics.


Monday, November 21, 2016

Thanks = Dankie

Good Monday Bloglanders

I hope you are having a marvellous November!! Even though we don't do Thanksgiving down under in Sunny South Africa, I try to do a thank-you-journal every year. It's like my December Daily - a yearly routine. I just LOVE to look back at my stash of journals lined up on my shelve.

Have a look at this one!!! It's still next to my craft desk and one of my all time FAVE mini books.

Let me show you what I made this year:


I'm using this handmade Travellers Notebook and Collect pictures to reflect at my blessings. We are SUPER busy during November at home and at work and I wanted to speed things up a bit. Let's peek inside:


I decorated this page with Gesso, a stencil, die cuts and scraps of paper. I printed 4 Collect pictures on a 6x4 photo, cut them apart and DONE. My aim is to have at least 12 pictures and therefore pages in my journal. Throughout the years I have learned not to do a page a day as it's too overwhelming for me.

And a few more pics:


I'm still trying to use what I have in my stash in my quest to live cleaner and leaner. It's not working but I'm trying!! Except for my pics - I stayed true to my myself in this project and I love how it turned out. I will probably add another picture or two to this post as I still have a few pages to fill up and I also want to add "November 2016 / just "2016" to the front or back covers.

Now you have to excuse me - I'm off to prep my December Daily notebook!!

Thanks for looking at my blog today .................................. please come back to play.


PS. I'll be adding my notebooks to my Project Life album. I love them on a shelf  but I also want to store everything in one place.  Watch this space and I'll show you how.

AND
DANKIE = THANK YOU IN AFRIKAANS


Sunday, June 12, 2016

Giftwrap Summer Garden Notebook

Hello Bloglanders

Happy Sunday to you all!!

Today I have a covered notebook to share:


Even though it's winter down under in Sunny SA, I got so inspired with the SimonSaysStamp Monday Challenge "Summer Garden" that I just had to get into the vibe.

You know me - LOTS of notebooks on my desk and in my pressie stash. It is SO easy just to add a funky pen / pencil and you have a beautiful, homemade present. No need for a lot of wrapping - just a glassine envelope and a bit of twine and you're ready to go - no use hiding all that beautiful stuff.

For this one I used butterfly wrapping paper to cover an ordinary notebook. Added a doily, some die cuts, stamping and scraps from my stash and it's ready to go. Even the title was die cut from glitter foam - nothing shop bought here!!

And a bit closer:

I LOVE to "sign" and date all my projects, This one got it on the back:


And I'm already using my brand new Summer Garden Notebook!!


With one roll of cheap wrapping paper I've covered numerous pressies, made this notebook, a planner page and a travel journal (it's coming in another post) and there's some more left. Here you can see a bit more of the beautiful print on the wrapping paper.


It's  really hard to get good scrapping supplies down under in Sunny SA. If I buy, I normally order online all the way from the USA. SimonSaysStamp is most definitely my FAVE shop and their shipping is the most affordable out there. Believe it or not but most shops don't even want to ship to South Africa!!  Anyway, what I wanted to say is that I tend to spend my money on dies, stamps and ink as they are rather Light and therefor cheap to ship. Then I look around for cheaper paper and art options locally.

So far it's working very, very well for me. If you are short of cash or living down under somewhere - just follow my example and use stuff that's already out there and available. Most of the time it's free!!!

That's it!! I hope you enjoyed my gift wrap Summer Garden Notebook as much as I have.

Have a GREAT week and please check back. I'm working on my VERY FIRST video EVER. It still needs some tweaking but it will hopefully be up before the weekend. You don't want to miss out as I'll show the inside of this travel journal that I've featured in my previous post. Once again, all supplies from my scrap stash and the local office supply shop.


Just scroll down or click here.

Bye, have FUN and thanks for looking at my bloggie.


Sunday, January 31, 2016

Notebook Layout

Happy Sunday Bloglanders!!

I hope you are having a wonderful time!! It is VERY hot down under in Sunny SA and even though I try to keep up with my crafting - today I thought it too hot to do. Therefor I'm sharing a project from a few days ago.


This page is all about the similarities between me and my mum. Not a lot but still worth mentioning - for the rest of my life, I will remember her sewing - she made ALL our clothes and it looked like designer outfits. I suppose they were - we drew pictures and she made it come to life.

Here you can see the whole page:


My inspiration came from this week's Magazine Monday Challenge:


and the colourful background came from last week's challenge:


Who said you only have to be inspired by one thing??? I loved the black title and doodling but as I decided to simplify my crafting this year, I only used black letters, journaling and a flourish on  my "busy" background. It was super easy and finished in a flash.

I added a picture of me and my mum. The frame is from one of Wilna Furstenberg's classes. Love it and have used it on numerous projects.

I love how it turned out and can't wait to get inspired by next week's Magazine Monday!!

Thanks for looking at my blog. Tomorrow is the 1st of February - if you haven't started on your New Year's resolutions - now is the time!! Get going with the first thing on your list - by the end of the year you would have accomplished 11. Even if you only get to 5 - it's 5 more than before!!

Have a GREAT week and a LOVE-ly February!


Tuesday, July 7, 2015

Dotty Day Notebooks

Good morning Bloglanders

I'm back from Wernich's graduation. And here you can see the elated graduates from the Architecture Masters Degree class of 2014.


Sometimes I feel more elated than the boys - paying for studies is not for the faint hearted!!

Today I'm sharing a project with recycled ingredients. Notebooks.


We keep all our office leftover copy paper in a box and whenever I get the time, I diecut it into shapes for notebooks. With Work in Process, they get stored in a pretty, red, heart tin.


Even the sturdy covers come from recycled packaging material.


I keep a stash of the finished notebooks in my craftroom and whenever I have to whip up a quick pressie or thank-you-gift, I add a sentiment and there it goes. It's SO pretty, I don't even have to wrap it. This specific one will go towards a birthday and I plan to add a sentiment that says "Have a Hotty, Dotty B-Day". Best part is - I hand out refills to family and friends (and myself) to fill up the Notebooks once used. The inspiration for my dots came from the SimonSaysStamp Wednesday Challenge:

WE’RE GOING DOTTY!

I don't always have a clear idea of what I want to use to decorate my projects. THEN ...................... I look around Blogland for some inspiration and very soon I've got a brilliant idea. I'm a VERY visual person - colours, textures and shapes inspire me.

That's it from me. Thanks for looking at my blog today. Have a wonderful day and please come back to play!


PS. If you missed the previous time that I've shown some of these Notebooks, here they are! I've added a picture of one to my Instagram feed as well. Just look to the right of my Blog header or click here.

Friday, February 13, 2015

Valentine Inspiration

Hello Bloglanders

I hope you are having a happy Friday the 13th and if things are not going your way - kick up your heels - tomorrow is Valentine's day and you deserve some fun!! Spread some LOVE.

I'm always looking for non-edible Valentine favours for my family. Don't ask me why, but I think it's because I like things to last more than a day. And these are ones that I found on Pinterest:

This one knocked my socks off!!


LINK

And you blow me away:


Colouring-in is the new flavour of the month @ Hamman HQ:


My family IS exSTRAWordinary.


Lego for the little (and not so little) ones:


Staying with the kiddos:


Something "BEE" themed:


NEVER enough pens and pencils @ Hamman HQ:


Most of the time I'll do a subway print for to zuss up my house. Of course mine will be in Afrikaans as it is my home language and if you check back tomorrow, I'll gladly share my effort. This is the one that inspired me:


I love to recycle and notepads are ALWAYS useful:


For those of you who got down to business months ago - let's hear what you did!  Leave me a comment and for those of you who are rushing around to finish projects (like IMPERFECT ME) - good luck and keep going.

Have a great weekend and remember to have FUN and to try something new - TODAY!


Friday, November 7, 2014

Scrap Fabric Covered Notebooks

Hello Bloglanders

Happy Friday to you all!!!  I hope you will be having a Wonderful Weekend with lots of time to do the things you love.

Today I'm sharing my Fabric Covered Notebook. I used REAL scraps of bull denim. All the cream and white scraps go into a bin and I wanted to use some of it for my Christmas pressies.  I tore the scraps in strips, dyed it with fabric dye and adhered it to my notebooks.

This will be my girlfriend pressies. Who doesn't need a notebook???? 1st one from the Play as U GO production line:

And for those of you who want the inside info:


1. I only have 3 colours of dye in my stash - yellow, blue and pink.  I used 1 teaspoon of dye dissolved in 1 cup of boiling water. Everything went into empty jars and then I started mixing until I had 5 different colours.
2. Add your strip of fabric to the jar and SHAKE, then hang to dry. It drips and makes a mess. Make sure you put some newspaper underneath.
3. Uses a page from the notebook you want to cover (for size) and start pinning your stips to the paper. Leaving about 1 cm extra fabric for the sides and bottom and about 3 cm at the top.
4. Back view.


5. Stitch in place.
6. Back view.
7. Fold the edges over and pin in place.
8. Stitch around the edge to keep the seam in place.


9. Stitching done.
10 Start decorating. I wanted to try out Amy Tangerine's stitch templates. It worked SO well. Just poke the holes in the backing paper as you wouldn't be able to see it on the fabric.
11. Cover the inside with a piece of cardstock and glue in place. My notebooks doesn't have ANY covers - if yours does, you can glue your fabric cover directly onto it.
12  Some more decorating. DONE!!!

I totally love my project. Lots of scraps, cheap and totally adorable and usable!!

I'm off to make some more. YEAH,  I do have lots of friends and each and every one will get one. Until we meet again, have fun and try something new - TODAY.


Friday, October 24, 2014

Leftover magic

Good morning Bloglanders

Finally, it's weekend!! I'm just checking in to show what I did with a leftover die cut from this set. I used most of it to do this layout:


You know me - waste not, want not. SO, the "overlefts" were just right for my "IDEES" notebook. (Idees = Ideas).  I always keep one on hand - to write notes, links, I even add pictures when I want to scraplift. And here she is:

I used a shop bought notebook, added the die cut, a brad and a glitter foam title.  No mess, no fuss and something have been used that would have ended up in my scrap bin.

This is such an easy way to pretty up notebooks. I think I'll be doing some more for my pressie stash and for my DIY friends I'm going to pack everything in kit form. Watch this pace and all will be revealed!!

That's it from me. I'm working on a "hanging bow" for our Princess. Ever heard of it??? Me neither but trust my funky daughter-in-law to come up with bright, new ideas. I'll show my version in my Sunday Summary. Just check back.

Have a great day and weekend. Thanks for looking at my bloggie and see U soon.