Hello Bloglanders
It's that time of the year again .................................. time for me to wish you happy holidays.
Have fun, enjoy well deserved time with your loved ones and make time to do something special for yourself.
Showing posts with label Christmas. Show all posts
Tuesday, December 29, 2015
Friday, December 19, 2014
Merry Christmas 2014 and a WONDERFUL 2015
Good morning Bloglanders
I'm just checking in to wish you well for the festive season. I hope that all your dreams will come true and that you will have a blast with your loved ones.

I know I didn't get to everything I planned for 2014 but I'm fine with that. I'm going to sit back and relax and have lots of fun with Wynand and the children. We will be spending our holiday in Europe this year. We've all been there before but NEVER in winter. For someone from Sunny South Africa, that means that hopefully we will have a white Christmas.
As my Project Life came to a screeching halt when my mum got sick, I will do monthly layouts for November and December but that will have to wait for a brand new year.
In the meantime, have fun and ENJOY!!! See you around Blogland in 2015.
I'm just checking in to wish you well for the festive season. I hope that all your dreams will come true and that you will have a blast with your loved ones.

I know I didn't get to everything I planned for 2014 but I'm fine with that. I'm going to sit back and relax and have lots of fun with Wynand and the children. We will be spending our holiday in Europe this year. We've all been there before but NEVER in winter. For someone from Sunny South Africa, that means that hopefully we will have a white Christmas.
As my Project Life came to a screeching halt when my mum got sick, I will do monthly layouts for November and December but that will have to wait for a brand new year.
In the meantime, have fun and ENJOY!!! See you around Blogland in 2015.
Tuesday, November 18, 2014
Christmas stars
Hello Bloglanders
And I made some stars for my Xmas decor. First of all, I want to share my project inspiration:
I'm thinking about the middle one with different ornaments but with the whimsy feeling of the left and right pictures. We will see. I'll hang my ornaments as I go but the one for my friend will only have numbers. She can then open a pressie each day up to her birthday and hang it as she goes. An advent calendar of sorts.
And here they are:
They are made from chipboard and I added some paint and glitter to zuss them up.
Here you can see mine dangling in the wind
.
Tomorrow I'll be adding little red hearts to my "garland". Check back and see what I come up with. Thanks for crafting with me today and I hope to see u around Blogland again soon. For those of you looking for more "starry" inspiration, hop over to the SimonSaysStamp Wednesday challenge and see what the rest of Blogland came up with.
Bye for now.
Sunday, November 16, 2014
DIY Angels
Hi there Bloglanders
It's still busy, busy, busy at HQ Hamman. Wernich is back home and sleeping in his unfinished flat!!! Still a LOT to do. My aunt came to visit my mum and stayed with me for a week. I loved having her and I think it was very good for my mum to see her. She is leaving for Canada in a few weeks as all her children lives abroad. This weekend my sister came all the way from the Eastern Cape to be with mum. Yes, it's hectic down under in Sunny SA.
Last week I told you that I'll be making my own Christmas ornaments. It took a bit longer than I anticipated as I couldn't decide on a colour scheme but here is my first project: DIY Christmas angels.
I'll be doing all my ornaments in white, silver, neutral and a touch of red.
Version 1:
I used pot cleaners for the hair. It's actually an old one that I washed in my dishwasher. The new ones looked too gold for my project. I added a red glitter die cut heart that I've cut from glitter foam to zuss it up.
And version 2:
This time I used the packaging material that comes with the Studio Calico kits for hair and a heart button for the touch of red. I LOVE the hair!!
For those of you who want to try it: My WIP:
1. Die cut the pattern / cut by hand. I used my Silhouette but the original pattern comes from here. I just omitted the head as I wanted to use a bead. I used silver cardstock but you can use whatever takes your fancy. My angel is half the size of the original pattern.
2. Fold and staple in place. It looks complicated but once you've done the body the wings slide into one another. REAL easy.
3. I used a bead underneath the angel's dress to attach some ribbon to hang my angel.
4. Bead, body, face bead.
Decorate and it's DONE.
I'll be back with some more Christmas decorations tomorrow. I'm really trying to use what I have on hand and not to buy ANYTHING. The South African postal service crashed and at this stage it's nearly impossible to get your hands on any nice crafting goodies. SO, I'm using ordinary items to make extraordinary goodies. Why don't you join me and craft along. The idea is to make at least 20 ornaments before Christmas. I'll be making everything X2. One set I'll keep and another I'll give to a friend who has a BIG birthday on the 19th of December. An advent calendar of sorts. Don't stress .......................... I'll share right here on Play as U Go.
Thanks for looking at my blog and remember to try something new - TODAY!! On that note .................... I'm off to work on tomorrow's project.
It's still busy, busy, busy at HQ Hamman. Wernich is back home and sleeping in his unfinished flat!!! Still a LOT to do. My aunt came to visit my mum and stayed with me for a week. I loved having her and I think it was very good for my mum to see her. She is leaving for Canada in a few weeks as all her children lives abroad. This weekend my sister came all the way from the Eastern Cape to be with mum. Yes, it's hectic down under in Sunny SA.
Last week I told you that I'll be making my own Christmas ornaments. It took a bit longer than I anticipated as I couldn't decide on a colour scheme but here is my first project: DIY Christmas angels.
I'll be doing all my ornaments in white, silver, neutral and a touch of red.
Version 1:
I used pot cleaners for the hair. It's actually an old one that I washed in my dishwasher. The new ones looked too gold for my project. I added a red glitter die cut heart that I've cut from glitter foam to zuss it up.
And version 2:
This time I used the packaging material that comes with the Studio Calico kits for hair and a heart button for the touch of red. I LOVE the hair!!
For those of you who want to try it: My WIP:
1. Die cut the pattern / cut by hand. I used my Silhouette but the original pattern comes from here. I just omitted the head as I wanted to use a bead. I used silver cardstock but you can use whatever takes your fancy. My angel is half the size of the original pattern.
2. Fold and staple in place. It looks complicated but once you've done the body the wings slide into one another. REAL easy.
3. I used a bead underneath the angel's dress to attach some ribbon to hang my angel.
4. Bead, body, face bead.
Decorate and it's DONE.
I'll be back with some more Christmas decorations tomorrow. I'm really trying to use what I have on hand and not to buy ANYTHING. The South African postal service crashed and at this stage it's nearly impossible to get your hands on any nice crafting goodies. SO, I'm using ordinary items to make extraordinary goodies. Why don't you join me and craft along. The idea is to make at least 20 ornaments before Christmas. I'll be making everything X2. One set I'll keep and another I'll give to a friend who has a BIG birthday on the 19th of December. An advent calendar of sorts. Don't stress .......................... I'll share right here on Play as U Go.
Thanks for looking at my blog and remember to try something new - TODAY!! On that note .................... I'm off to work on tomorrow's project.
Labels:
angel,
Bead,
Christmas,
DIY,
ornament,
paper,
pot cleaner,
SimonSaysStamp
Friday, November 7, 2014
Scrap Fabric Covered Notebooks
Hello Bloglanders
Happy Friday to you all!!! I hope you will be having a Wonderful Weekend with lots of time to do the things you love.
Today I'm sharing my Fabric Covered Notebook. I used REAL scraps of bull denim. All the cream and white scraps go into a bin and I wanted to use some of it for my Christmas pressies. I tore the scraps in strips, dyed it with fabric dye and adhered it to my notebooks.
This will be my girlfriend pressies. Who doesn't need a notebook???? 1st one from the Play as U GO production line:
And for those of you who want the inside info:
1. I only have 3 colours of dye in my stash - yellow, blue and pink. I used 1 teaspoon of dye dissolved in 1 cup of boiling water. Everything went into empty jars and then I started mixing until I had 5 different colours.
2. Add your strip of fabric to the jar and SHAKE, then hang to dry. It drips and makes a mess. Make sure you put some newspaper underneath.
3. Uses a page from the notebook you want to cover (for size) and start pinning your stips to the paper. Leaving about 1 cm extra fabric for the sides and bottom and about 3 cm at the top.
4. Back view.
5. Stitch in place.
6. Back view.
7. Fold the edges over and pin in place.
8. Stitch around the edge to keep the seam in place.
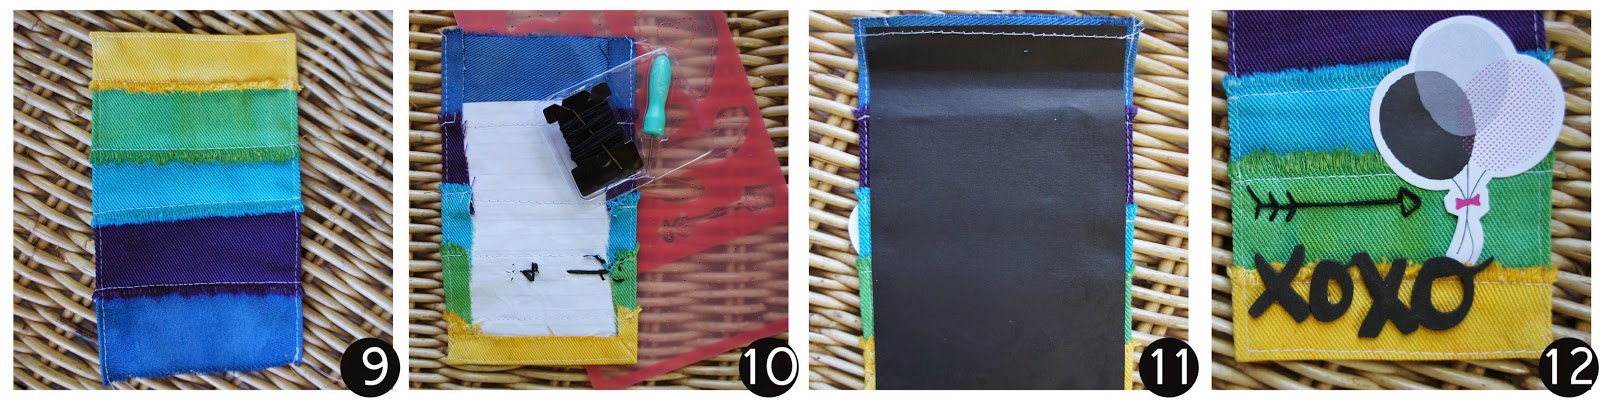
9. Stitching done.
10 Start decorating. I wanted to try out Amy Tangerine's stitch templates. It worked SO well. Just poke the holes in the backing paper as you wouldn't be able to see it on the fabric.
11. Cover the inside with a piece of cardstock and glue in place. My notebooks doesn't have ANY covers - if yours does, you can glue your fabric cover directly onto it.
12 Some more decorating. DONE!!!
I totally love my project. Lots of scraps, cheap and totally adorable and usable!!
I'm off to make some more. YEAH, I do have lots of friends and each and every one will get one. Until we meet again, have fun and try something new - TODAY.
Happy Friday to you all!!! I hope you will be having a Wonderful Weekend with lots of time to do the things you love.
Today I'm sharing my Fabric Covered Notebook. I used REAL scraps of bull denim. All the cream and white scraps go into a bin and I wanted to use some of it for my Christmas pressies. I tore the scraps in strips, dyed it with fabric dye and adhered it to my notebooks.
This will be my girlfriend pressies. Who doesn't need a notebook???? 1st one from the Play as U GO production line:
And for those of you who want the inside info:
1. I only have 3 colours of dye in my stash - yellow, blue and pink. I used 1 teaspoon of dye dissolved in 1 cup of boiling water. Everything went into empty jars and then I started mixing until I had 5 different colours.
2. Add your strip of fabric to the jar and SHAKE, then hang to dry. It drips and makes a mess. Make sure you put some newspaper underneath.
3. Uses a page from the notebook you want to cover (for size) and start pinning your stips to the paper. Leaving about 1 cm extra fabric for the sides and bottom and about 3 cm at the top.
4. Back view.
5. Stitch in place.
6. Back view.
7. Fold the edges over and pin in place.
8. Stitch around the edge to keep the seam in place.
9. Stitching done.
10 Start decorating. I wanted to try out Amy Tangerine's stitch templates. It worked SO well. Just poke the holes in the backing paper as you wouldn't be able to see it on the fabric.
11. Cover the inside with a piece of cardstock and glue in place. My notebooks doesn't have ANY covers - if yours does, you can glue your fabric cover directly onto it.
12 Some more decorating. DONE!!!
I totally love my project. Lots of scraps, cheap and totally adorable and usable!!
I'm off to make some more. YEAH, I do have lots of friends and each and every one will get one. Until we meet again, have fun and try something new - TODAY.
Sunday, March 30, 2014
Xmas Tags - Month 3
Hi there Bloglanders
I've been so busy with last week's Blog Hop that I totally neglected you. Actually, I loved the idea of people hopping over to my blog and be at the right post immediately so I used my time wisely ........ working on some more crafting projects.
Remember my Christmas tag project using digi stamps?? It's from Digistamps4joy and you can visit them here. Here is my March effort:
And this is the image that I received:
I reduced the size to a bit smaller than 3x4, printed it X4 on vellum and then added red cardstock, twine and a dimensional sticker that I made with my Silhouette. As easy as that. And a close-up:
While everything was out, I did some more dimensional stickers to pretty up my Christmas presents and cards. I have added the picture on top of my post because it was so pretty and Christmassy even if it is only March (OK, nearly April!!)
The plan is to make 6 of each tag and dimensional sticker and then give 5 sets to family and friends to ease their Christmas rush.Of course, charity begins at home - I will keep set #6.
That's it. Another project done and dusted. Thanks for looking at my blog today and please come back to play.
Hazel
Thursday, February 27, 2014
3D Christmas Embellishments
Hallo Bloglanders
I hope you are having a Wacky Wednesday. It's the end of the month, end of the tax year, end of the financial year and very, very busy at HQ Hamman. However, when I can't take on a BIG project, I try to get some smaller ones done in the time that I have on hand.
And here is my 3rd set of dimensional embellishment. I'm joining in the fun of this challenge. Once again is to create a Christmas card (X2), upload it and by December you will have a stash of 24 ready to mail off / give away. As I don't do a lot of cards, I create tags. Here is my attempt:
I've used a Silhouette cut file for the trees, filled the shape with digital prints and the software's "print and cut" function. Foam pop dots to attach the trees to my tags and it's done.
While printing the trees for the tags, I doubled up and did some for my dimensional Christmas embellishment sets:
I do these sets X6 and will give 5 sets to close friends and family to pretty up their Christmas decor and to make life a bit easier for them ............................ of course, charity begins at home so set #6 will be all mine. I even kept the negatives from the die cuts. These will become more tags when I have some time on hand again. Keep checking back ...................................... all will be revealed right here on my blog.
I hope you are having a Wacky Wednesday. It's the end of the month, end of the tax year, end of the financial year and very, very busy at HQ Hamman. However, when I can't take on a BIG project, I try to get some smaller ones done in the time that I have on hand.
And here is my 3rd set of dimensional embellishment. I'm joining in the fun of this challenge. Once again is to create a Christmas card (X2), upload it and by December you will have a stash of 24 ready to mail off / give away. As I don't do a lot of cards, I create tags. Here is my attempt:
I've used a Silhouette cut file for the trees, filled the shape with digital prints and the software's "print and cut" function. Foam pop dots to attach the trees to my tags and it's done.
While printing the trees for the tags, I doubled up and did some for my dimensional Christmas embellishment sets:
I do these sets X6 and will give 5 sets to close friends and family to pretty up their Christmas decor and to make life a bit easier for them ............................ of course, charity begins at home so set #6 will be all mine. I even kept the negatives from the die cuts. These will become more tags when I have some time on hand again. Keep checking back ...................................... all will be revealed right here on my blog.
I'm off to get ahead with my admin. Have a wonderful day and thanks for looking at my blog today.
Bye
Hazel
Friday, February 21, 2014
Dimensional embellishments with digi stamps.
Hi there Bloglanders
Wynand's back from a business trip and things are slowly getting back to normal. While he was away I had more time for my own things but I also had sole responsibility for home, garden, the boys and the office. Can't decide if I got more of my own stuff done with or without him.
What I can tell you is that I ate what and when I wanted. Wynand is a picky eater - no avo, mango, spinach, risotto, souffle ....................................... I can go on forever! So, I had spinach souffle for breakfast and sushi for lunch and chips and avo dip for dinner. Today, it's back to counting points with Weight Watchers. After all, I have a HUGE wedding in 6 months.
While in the office, I had some time to play and tried my luck at another digi stamp. I've joined this challenge and you can see my first effort here. And didn't this little dragon turn out great?
The idea is that you make one, upload it and then you receive the next month's stamp free. GREAT IDEA. Come December and you will have 12 projects to add some speed to your Christmas rush. As I don't really do cards, own about 3 Copic markers and mass produce wherever I go, I converted my shape to a Silhouette cutting file, cut them X6 from a single 6x4 sheet and mounted them on green cardstock (I used offset to cut the green a bit bigger than my original image).
This month I couldn't decide what my tag should look like so I opted to make dimensional embellishments from the digi stamp. Now it is ready whenever I need a quick fix for a Christmas project. Once again, I'm doing them x6. That will enable me to spread some pre Christmas love to 5 of my friends. I added pop dots to the back and all the embellishments go onto an A4 transparency. Later, I will cut them apart ........................ let's not spoil the surprise, I'll show when I get there.
And here it is - my digi, dimensional, Christmas embellishments. January and February done and dusted.
That's it from me. I'm off to cook some chicken pie, rice and potatoes for lunch. Thanks for looking at my blog today. Please check back as I have lots more to share right here on Play as U Go. Have a great day!
Bye
Hazel
Wynand's back from a business trip and things are slowly getting back to normal. While he was away I had more time for my own things but I also had sole responsibility for home, garden, the boys and the office. Can't decide if I got more of my own stuff done with or without him.
What I can tell you is that I ate what and when I wanted. Wynand is a picky eater - no avo, mango, spinach, risotto, souffle ....................................... I can go on forever! So, I had spinach souffle for breakfast and sushi for lunch and chips and avo dip for dinner. Today, it's back to counting points with Weight Watchers. After all, I have a HUGE wedding in 6 months.
While in the office, I had some time to play and tried my luck at another digi stamp. I've joined this challenge and you can see my first effort here. And didn't this little dragon turn out great?
The idea is that you make one, upload it and then you receive the next month's stamp free. GREAT IDEA. Come December and you will have 12 projects to add some speed to your Christmas rush. As I don't really do cards, own about 3 Copic markers and mass produce wherever I go, I converted my shape to a Silhouette cutting file, cut them X6 from a single 6x4 sheet and mounted them on green cardstock (I used offset to cut the green a bit bigger than my original image).
This month I couldn't decide what my tag should look like so I opted to make dimensional embellishments from the digi stamp. Now it is ready whenever I need a quick fix for a Christmas project. Once again, I'm doing them x6. That will enable me to spread some pre Christmas love to 5 of my friends. I added pop dots to the back and all the embellishments go onto an A4 transparency. Later, I will cut them apart ........................ let's not spoil the surprise, I'll show when I get there.
And here it is - my digi, dimensional, Christmas embellishments. January and February done and dusted.
That's it from me. I'm off to cook some chicken pie, rice and potatoes for lunch. Thanks for looking at my blog today. Please check back as I have lots more to share right here on Play as U Go. Have a great day!
Bye
Hazel
Thursday, January 16, 2014
Try Something New: Digi Stamps
Good morning Bloglanders
I hope you are well. I've got a hectic day ahead and want to share what I did yesterday before things heat up. (work as well as Sunny SA).
After comments on my posts from fellow South Africans, I hopped upon digi stamps from Digistamps4Joy's Christmas challenge. In January????? Yes, and what a GREAT idea. They post a free digi stamp and once you link up your effort, you receive the next month's image free. By December you will have 12 cards ready to send.
I don't use a lot of cards - I'll rather write a letter or use a tag. So, I adapted my digi stamp. Also, I decided to use my Silhouette to color and cut. And here it is:
I plan to make 8 of each and them give them away in sets of 12 to family and friends at the beginning of December. That would make life a lot less complicated - tags sorted before you even start your Christmas shopping.
One of my New Year's resolutions is to try new things - well, digi stamps got that one covered for me! If any of you would like to have my Silhouette cutting and coloring file, let me know and I'll gladly share. It looks like this:
The best part is that the work is done and should I need more images, it will only be a matter of "print and cut" with my Silhouette.
And my "Work in Progress" pic for those who want the inside info:
That's it. I'm off to try something new ................................... watch this space. Thanks for visiting my blog and have a Thunderous Thursday!
Hazel
I hope you are well. I've got a hectic day ahead and want to share what I did yesterday before things heat up. (work as well as Sunny SA).
After comments on my posts from fellow South Africans, I hopped upon digi stamps from Digistamps4Joy's Christmas challenge. In January????? Yes, and what a GREAT idea. They post a free digi stamp and once you link up your effort, you receive the next month's image free. By December you will have 12 cards ready to send.
I don't use a lot of cards - I'll rather write a letter or use a tag. So, I adapted my digi stamp. Also, I decided to use my Silhouette to color and cut. And here it is:
I plan to make 8 of each and them give them away in sets of 12 to family and friends at the beginning of December. That would make life a lot less complicated - tags sorted before you even start your Christmas shopping.
One of my New Year's resolutions is to try new things - well, digi stamps got that one covered for me! If any of you would like to have my Silhouette cutting and coloring file, let me know and I'll gladly share. It looks like this:
The best part is that the work is done and should I need more images, it will only be a matter of "print and cut" with my Silhouette.
And my "Work in Progress" pic for those who want the inside info:
That's it. I'm off to try something new ................................... watch this space. Thanks for visiting my blog and have a Thunderous Thursday!
Hazel
Tuesday, December 24, 2013
Happy Holidays
Hi there Bloglanders
I'm on my way to get the last things done for dinner with the family. I still have lots more to share with you but that will have to wait until after Christmas. Three years ago I stated "Project 52". My idea was to get 52 projects done during a year. (excluding scrapbook and PL pages) Since I started blogging, that amount has upped and I've done more than 150 projects during 2013!! I do get depressed quite easily and it helps to keep me going if I have to put something up for you to see on a daily basis and the creativity around Blogland does wonders for me.
For the first time, I have a whole file of "un blogged" projects. I can't decide if this means that I've been more depressed during 2013 or just more inspired. Let's go with the "more inspired". And on that positive note ...................................... Happy Holidays to you, my Blogland friends.
I did bring a project to share!! Here it is:

It started out as another of my Afrikaans Subway Art projects. Once done, I decided to do one for my English Blogland friends as well. The idea was sort of a chalkboard effect and I used the Silhouette software for everything. Once done, I used the same shape ......................................
For my Christmas cards:
As well as for the little canvas bags I made:
I've done a whole stack of these. They are approximately 6x4 and inside I've put a framed subway art print. They were mailed to family and friends that I won't see over the festive season. Also, I've stuffed some with little pressies for the neighborhood kids. Nothing like keeping them occupied over the holidays and it's a great way to recycle some of your stash.
The last one didn't get photographed ................................ YET!! To tell you the truth, I totally forgot about them until I started doing this post. See what I mean about Blogging being creative?? I've used the same artwork for tags. Totally unique and in Afrikaans .................................... I love using my home language in crafting projects.
That's it ................................. 1 project - 4 ways. I hope you enjoyed today's crafting fun. Be safe and enjoy the festivities. I'll be back with some more projects. Just come back to play.
If you want to download my subway art, you are welcome to get it:
here in English
hier in Afrikaans
Love U
Hazel
I'm on my way to get the last things done for dinner with the family. I still have lots more to share with you but that will have to wait until after Christmas. Three years ago I stated "Project 52". My idea was to get 52 projects done during a year. (excluding scrapbook and PL pages) Since I started blogging, that amount has upped and I've done more than 150 projects during 2013!! I do get depressed quite easily and it helps to keep me going if I have to put something up for you to see on a daily basis and the creativity around Blogland does wonders for me.
For the first time, I have a whole file of "un blogged" projects. I can't decide if this means that I've been more depressed during 2013 or just more inspired. Let's go with the "more inspired". And on that positive note ...................................... Happy Holidays to you, my Blogland friends.
I did bring a project to share!! Here it is:

It started out as another of my Afrikaans Subway Art projects. Once done, I decided to do one for my English Blogland friends as well. The idea was sort of a chalkboard effect and I used the Silhouette software for everything. Once done, I used the same shape ......................................
For my Christmas cards:
As well as for the little canvas bags I made:
I've done a whole stack of these. They are approximately 6x4 and inside I've put a framed subway art print. They were mailed to family and friends that I won't see over the festive season. Also, I've stuffed some with little pressies for the neighborhood kids. Nothing like keeping them occupied over the holidays and it's a great way to recycle some of your stash.
The last one didn't get photographed ................................ YET!! To tell you the truth, I totally forgot about them until I started doing this post. See what I mean about Blogging being creative?? I've used the same artwork for tags. Totally unique and in Afrikaans .................................... I love using my home language in crafting projects.
That's it ................................. 1 project - 4 ways. I hope you enjoyed today's crafting fun. Be safe and enjoy the festivities. I'll be back with some more projects. Just come back to play.
If you want to download my subway art, you are welcome to get it:
here in English
hier in Afrikaans
Love U
Hazel
Thursday, December 19, 2013
Gingerbread House
Hi there Bloglanders
I hope you are well. I'm back from Robertson and feel renewed, loved and inspired after my visit to my oldest friend. As promised, I'm here to share my mini, mini gingerbread houses. And this is what it looks like:
Unfortunately it's not my own idea or pattern but I enjoyed making them and will definitely come up with a twist of my own. Hop over to Cutsy Crafts to get the tutorial. I've also learned how to stiffen felt - very easy. I didn't have any glue on hand so I used Podge - turned out perfectly.
And some more pics:
And these two beauties are dangling on a tree in Robertson. I've already cut some more to make a few for my own tree. Just love giving handmade goodies! Tomorrow I'll share the little gift bag that my friend made for me as a Christmas gift. Please check back as you don't want to miss out.
Thanks for looking at my blog today. I hope you have a lovely day and that I'll be seeing you over here again soon.
Hazel
I hope you are well. I'm back from Robertson and feel renewed, loved and inspired after my visit to my oldest friend. As promised, I'm here to share my mini, mini gingerbread houses. And this is what it looks like:
Unfortunately it's not my own idea or pattern but I enjoyed making them and will definitely come up with a twist of my own. Hop over to Cutsy Crafts to get the tutorial. I've also learned how to stiffen felt - very easy. I didn't have any glue on hand so I used Podge - turned out perfectly.
And some more pics:
And these two beauties are dangling on a tree in Robertson. I've already cut some more to make a few for my own tree. Just love giving handmade goodies! Tomorrow I'll share the little gift bag that my friend made for me as a Christmas gift. Please check back as you don't want to miss out.
Thanks for looking at my blog today. I hope you have a lovely day and that I'll be seeing you over here again soon.
Hazel
Thursday, November 28, 2013
Solar Jars for Christmas
Hallo Bloglanders
It is REALLY busy down under and I can't seem to get the time to get started on my Christmas prep. Normally I put everything up on December first but I'm not sure that I'll get there in time. Lucky me got a Silhouette during the year so maybe we can speed things up.
This is what I did yesterday:
Jip, I'm still in Solar Jar mode. I don't want to etch my jars as I would like to change them according to my decor. Remember my fall version??? Just click here for my most popular post.
This time round I used the "cut and lift" option to get a nativity scene cut onto vellum with my Silhouette. Just insert it in the jar and ta-da ............................ done!! I also tried it on black cardstock ...........................
What I love about my project is that after Christmas I can take it out of the jar and use it in a layout or on cards. I kept all the die cut shapes and it will be used in my December Daily 2013. Problems? The only one I encountered was that the paper tends to curl back where you have big cut-outs. Solution? I did little cuts to my artwork to keep the shapes intact.
See the red polka dot arrow? That's where a small cut in my shape keeps the negative shape that I've used in place.
It is REALLY busy down under and I can't seem to get the time to get started on my Christmas prep. Normally I put everything up on December first but I'm not sure that I'll get there in time. Lucky me got a Silhouette during the year so maybe we can speed things up.
This is what I did yesterday:
Jip, I'm still in Solar Jar mode. I don't want to etch my jars as I would like to change them according to my decor. Remember my fall version??? Just click here for my most popular post.
This time round I used the "cut and lift" option to get a nativity scene cut onto vellum with my Silhouette. Just insert it in the jar and ta-da ............................ done!! I also tried it on black cardstock ...........................
What I love about my project is that after Christmas I can take it out of the jar and use it in a layout or on cards. I kept all the die cut shapes and it will be used in my December Daily 2013. Problems? The only one I encountered was that the paper tends to curl back where you have big cut-outs. Solution? I did little cuts to my artwork to keep the shapes intact.
See the red polka dot arrow? That's where a small cut in my shape keeps the negative shape that I've used in place.
And these are the shapes that's left for my December Daily:
I just love, love, love the little shapes! Sorry about the quality of my pic but I took it on my Silhouette cutting mat before I peeled them off.
That's it - if it doesn't work, alter your shape! In Silhouette Studio it's easy and FUN.
Have a great day and thanks for looking at my blog today. Have a great Thursday and please check back as I have lots more to share right here.
Hazel
Friday, November 15, 2013
Merry Christmas for Girls and Boys
Hi there Bloglanders
Just a quick post before you and I head off to a Wonderful Weekend. Yes!!! I've started on my Christmas pressies and these are what's going to the little nephews and nieces: Cappuccino 4 one:
What makes this idea wonderful is that you can use the same idea for girls AND boys. I just tone down the decorations a bit for the boys. I've used this idea before as gifts with cappuccino cups or coffee mugs.Check it out here and here. This time round I went with the current flavor of the month - JARS. In Sunny SA - EVERYTHING gets packed in jars from fresh summer salads to puddings and stationary. My jar is from Weck - what makes it wonderful is that it has a rubber seal on the lid and clips to hold everything in place. Also, no screw-on neck which means that you can drink / eat directly from the jar! Did you know that there is a whole blog full of crafts with jars??? Well, there is and you won't be disappointed if you hop over and see for yourself. Just click here.
Wanna know what's inside my jar?
A single serving Cappuccino, marshmallows, an Oreo cookie and a teaspoon. I've done this with Hot Chocolate and even with instant soup and croutons. Can't decide which one was more popular!
For embellishments I used a free cutting file from the Silhouette blog and as I said ........................ I did boy AND girl versions.
I actually did a whole stack - this will be great to add to any Christmas pressies or even to envelopes, mini books, layouts and Christmas crackers. I did use the offset function for my cutting line as I love having white around my titles - just makes it pop. Better even, I got all these holes in the die cut - no punching, just tread your twine or ribbon through.
OK, my quick post did turn into a rather long one - you never know with IMPERFECT ME. Have a GREAT weekend and please come back to play as I have lots and lots and lots more to share right here.
Hazel
PS. Did you spot my spelling mistake?? Well .............................. IMPERFECT ME!!
Tuesday, October 29, 2013
Christmas Layout with MME
Hallo Bloglanders
No, I haven't lost it. It IS a Christmas layout and I did it over the weekend. My first priority is to LIVE and only then will I have memories to preserve. So, every year over the holiday season I tend to insert pictures into my album without scrapping is. Should I have a piece of cardstock or embellishments that I want to use on the layout, I'll include it / insert a reminder note and then ...................................... 10 months later, I discover it and YOU get to see a Christmas layout in October!!
Here it is:
No, I haven't lost it. It IS a Christmas layout and I did it over the weekend. My first priority is to LIVE and only then will I have memories to preserve. So, every year over the holiday season I tend to insert pictures into my album without scrapping is. Should I have a piece of cardstock or embellishments that I want to use on the layout, I'll include it / insert a reminder note and then ...................................... 10 months later, I discover it and YOU get to see a Christmas layout in October!!
Here it is:
My inspiration came for this sketch from MME:
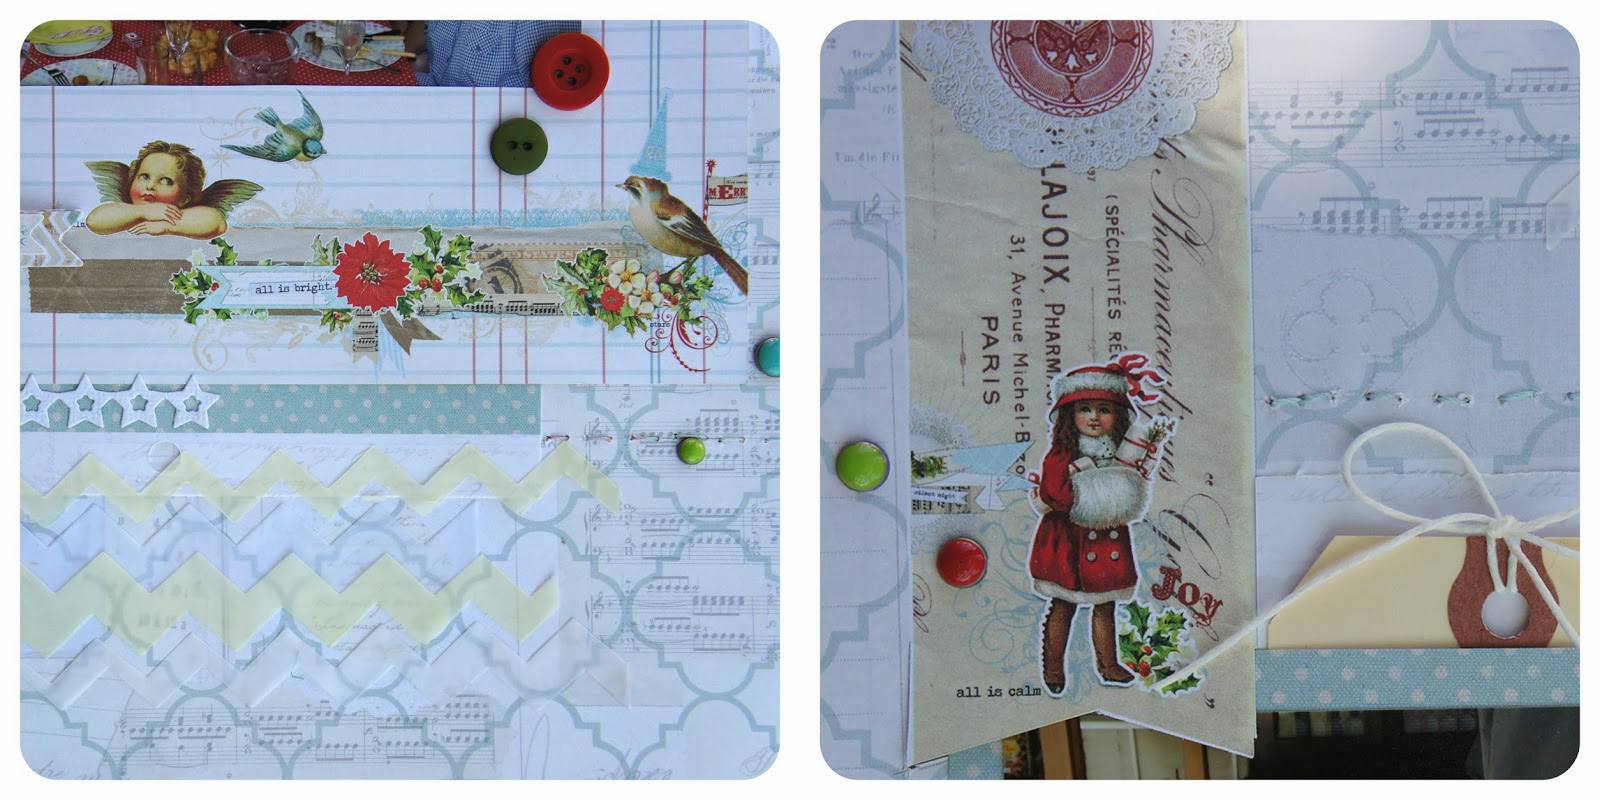
And while searching for a suitable photo, I saw this unscrapped Christmas pic with all the paper and embellishments already in my stash and included in the page protector. What can be easier?? It took me less than 20 minutes to do the whole thing.
And here you can see a close-up:
I added a few zig-zags cut from white and cream Vellum to add texture to my page. The rest all came from MME's "All is Bright" range. Best part .................................. another project done and dusted and it was GREAT reliving Christmas Eve 2012. Hop over to the MME blog to see the rest of the entries. Just click here.
That's it! I'm off to try my hand at homemade spinach gnocchi. My husband is away on a business trip and as he totally hates spinach I decided to treat myself. Check back to see how it turned out.
Thanks for looking at my blog today. Have a Terrific Tuesday and please come back to play.
Hazel
Sunday, October 20, 2013
And my Faves ....................
Good morning Bloglanders
It's Sunday in Sunny SA and I'm trying to get the creative juices flowing. I've watered down my Pic Picture classes to one layout a week. I know, it's not supposed to work like that BUT I have to keep up with the rest of my life as well. I'll share the one I've done in tomorrow's post.
A while ago I showed you the Blog posts that you loved most and today I'm sharing my own Faves. This one is SO totally my #1:
I love, love to look at last year's Christmas wreath. To tell you the truth, I loved it so much that I didn't want to pack it away - but I did and I look forward to see it again come 1st of December. Here is the link to the original post.
It's Sunday in Sunny SA and I'm trying to get the creative juices flowing. I've watered down my Pic Picture classes to one layout a week. I know, it's not supposed to work like that BUT I have to keep up with the rest of my life as well. I'll share the one I've done in tomorrow's post.
A while ago I showed you the Blog posts that you loved most and today I'm sharing my own Faves. This one is SO totally my #1:
2012 Christmas Wreath:
I love, love to look at last year's Christmas wreath. To tell you the truth, I loved it so much that I didn't want to pack it away - but I did and I look forward to see it again come 1st of December. Here is the link to the original post.
#2: Take along Barn:
#3: Mixed media covered File:
I do love this covered file as well:
#4: Rolled Tote:
#5: A Jar of Worms:
There you have it - My Faves!! And I'm SO inspired - just can't wait to whip up some more projects. Thanks for looking at my blog today. Have a wonderful week and please check back as I have lots and lots and lots more to share right here.
Hazel
Labels:
barn,
Christmas,
Christmas wreath,
Covered File,
DIY,
file,
Halloween,
Jar,
jar of worms,
top posts,
tote
Subscribe to:
Posts (Atom)